Monday, September 10, 2012

Gone Racing ...

Post & Pre-race inspection
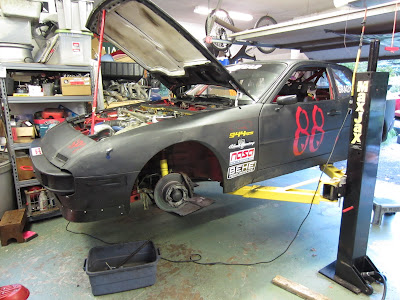
After the last NJMP race in July, the 44 got a good looking over. Due to an agricultural excursion in the last race, my front sway bar mount was a bit bent. Some quality time with an anvil and a 2 lb sledge hammer and it was good to go. A few minor issues were taken care of and the car was stuffed back into the trailer for the next race in Sept.

After a rainy labor day week where I spent my time fussing with the 2002, by Friday it was warm and muggy as I headed back to New Jersey Motorsports Park for a race weekend on the Lightning circuit. This time we were running with EMRA and had our own race group and block of time. Nuthin' but 44's.

Saturday morning was breezy and cloudy with temps in the low 70's, but it soon warmed up. In all we had about 10 944 Cup cars with a lone Supercup. Matt Marks, a former 944 Cup racer came back to join us this weekend.

Practice and Qualifying went without a hitch and I placed 5th, ready for the afternoon race. Sitting on the grid, the pace car headed out and I followed. As I traveled down the pit lane, the car started sputtering, and sounded terrible, like I had bent the valves or something. Heading out the track I had no power and couldn't keep the revs up. I became concerned that I wouldn't even make it back to the pits without dying. WTF? It ran strong all day and now this? On the outlap for the race?

I pointed the other cars by on the back straight and followed them around as they took the green flag while I headed into the pits & paddock. Once at my paddock spot, I got out, changed and went back to look at the car. A bit of prodding and poking showed nothing obvious. I restarted the car and the motor was fine. As the risk of repeating myself, WTF?  A lap around the paddock and a few incognito hi rev pulls behind the Lightbulb sound walls and the car was okay. So much for race 1.

Race 2 on Sunday the next morning was a different story. The officials wanted to grid us first come first served, and since I was the first to grid, put me on pole. While nice, I didn't deserve it and told them so. Their next idea was based upon race 1 finishing position, which would be put me in 11th. I wasn't going along with that either. Finally we got it sorted out and we gridded by our qualifying position as originally planned.

Today I was 5th in class, 6th overall, starting on the outside lane. I had a good start and by turn 5 I was 3rd in class, where I finished after some good racing. The results of this race set the grid for Race 3


Race 3, I started 3rd, and had a nose to tail battle with Bob Page pretty much the whole race. A couple laps in, I made a small bobble in the uphill turn and Bob got past me. I dogged him for several laps, hanging right off his rear bumper until he missed a shift in the left hander and got past him. Now it was Bob's turn, and he dogged me until about lap 15 when my tires started to go off. I was heading left in turn 4, leaning on my tires and they just said "Nope, not going to do it ..." and was spit out into the dirt. Bob thundered past again with a good lead. With about 5 laps to go I started to reel him in. Every lap I was bit closer. Al Cohen was in 3rd with a gap to Bob, then me.

All our tires were going off and our times were slowing a bit so we just maintained the same gap. My tires were done, I couldn't put any power down in the Lightbulb turn until at least halfway. Finally Matt Marks who was battling behind me with James Rothenberg, got free when James went flying off the track into the dirt at the left handler. With 2 laps to go I wasn't sure I could hold Matt off. On the last lap he dive bombed me into turn 1. I was afraid he was going collect me so I checked up, glad I did. Matt was able to keep it on the track ahead of me and I didn't have tires to take the fight to him. He took the checker in front of me, and I ended up 6th.

With that, I put the car back on the trailer in one piece and headed back home. Another good weekend racing. Gotta love it.
Monday, September 3, 2012

Labor Day Weekend

With the rain pouring down in buckets outside the garage, it hasn't been a great Labor Day weekend for outdoor activities. But I occupied myself with the bottomless bucket list of restoration tasks.


I've been motoring along, working in the engine compartment, bolting this bit here, that bit there when I ran into a small detour, typical when restoring a 40 year old vehicle. I had bolted in the upgraded starter and attached the wiring harness. Splitting off the harness was the plug for the alternator at the front of the motor. I  couldn't directly see the 3 prongs it plugged into, but I could see the hole surrounding them. I started pushing the plug but instead of that nice smooth tension that tells you it's going well, it started feeling "mushy". I immediately stopped and pulled the plug out. This calls for some up close inspection.

Naked Alternator 

After many years, pulling and inserting plugs, removing and tightening nuts and bolts, there's a very specific feel to the process. And I've learned that any deviation from that feel requires a full stop and lookie. Otherwise, pain, time and money are forecast for the future.

Practicing my yoga skills learned on the internet, I managed to twist my head, droplight and reading glasses into a position where an oblique view showed me the 3 prongs, which should have been parallel to each other, weren't.

Inserting my finger, two of the prongs wiggled. This is not good. The only thing to do is pull the alternator and  inspect it on my work bench. A careful inspection showed me the connector wasn't attached anymore and wasn't going to be fixed from the outside. It was time to dive into the mysteries of Alternator repair. This will be a new journey for me.

Closer view of the misbehaving connector
To repair the alternator, one must first open the alternator. This should have been a relatively straightforward task. It looked like the case was bolted together with 3 long bolts that spanned the case. That was indeed the case, but a more accurate description was 3 long bolts that spanned the case that haven't been turned in 40 years. A large screwdriver did nothing. A even bigger screwdriver did the same. I thought I heard laughter coming from the alternator, but it could be from the TV in corner.

2 days later, after numerous dousings of PB Blaster, heating with a propane torch, a BFH and vice grips, the secrets of the generator were revealed.

The culprit - the brushes and connector

In the Repair Booth - calling Dr SuperGlue ...
Once open it because obvious what was wrong. The connector prongs were on a mounting board that had the alternator brushes attached. And that board had split in half with the brushes on one side and the connectors on another. With a tube of superglue, this was an easy fix and shortly everything was back together again. The brushes looked good, and I relubed the bearings while I was there. And since the overall repair took several days, I went ahead and plated the pulley for extra bling points.

Good for another 40 years

Project deviation finished, back on track

Since there are still many things left to do, I didn't just sit around and watch the PB Blaster work. Next up was the brake booster and master cylinder. This should be reasonably straightforward job with one known pain point, the installation of the "bitch clip".

As it turns out the installation of the infamous clip went relatively smoothly. It connects the brake pedal lever from the cockpit to the actuator rod from the back of the brake booster. The space to work in is very limited and the sequence of actions require force vectors from different directions. Other than dropping the clip a couple of times and having to fish it out with a magnetic stick, it was done in 5 minutes.

What didn't go smoothly was connecting the brake lines to the master cylinder. The first two went easily, lulling me into dropping my guard. And then I heard that laughter again and this time, the TV wasn't on.

Brake booster - large round device bottom right, master cylinder is the
long cylinder in the middle. Brake lines attach to the sides and bottom.
Brake lines are flexible steel lines. The ends are flared and there is a knurled bullet shaped bolt/fitting that rides up against the flare and secures the line to the master cylinder. You just start it with your fingers and then tighten it down with a special wrench called a flared wrench. Very similar to a box wrench with a chunk cut out. The chunk allows you to slip the tool past the brake line and then onto the fitting. Since other than the chunk the tool grips the fitting on all sides, you get a nice secure grip and lessen the chance of rounding the fitting, which would really suck.

Like I said, the first two lines, in like Flint, but the 3rd... This was coming up from bottom. See the issue here is, the fitting isn't forgiving or sloppy. Some bolts and holes are loose and you can kinda wiggle to get started. The bolt will catch and automatically straighten up into alignment. This is the "feel" I was talking about earlier with the alternator connector. With the brake lines, the fitting needs to be perfectly perpendicular on all sides to get started and get threaded. With everything bolted and rigid this is an impossible task. So you loosen everything, twist and bend the lines. Since you can't see the line coming into the bottom you fiddle and wiggle, and fiddle some more. You think you get it started, turning one small thread at a time and .... it doesn't catch, it pops out. Brake line #3 took 60 minutes of work over 2 nights. I finally ended upside down in my engine compartment so I can eyeball the alignments. 10-15 minutes for each of the other lines, but it was finally done. You just never know where you're going find problems.

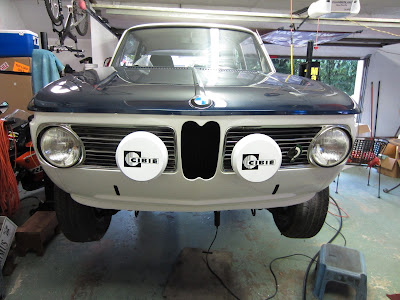
With that behind me, it was time for some fun, brainless activity. I fitted my grills, and the vintage Cibie driving lights. They'll have to come back off when I do the final adjustment of the hood, but they look pretty good.

With H4's and the Cibie's, I should be throwing down some serious light power


Attached the Euro spec turn signals Maggie got me for my birthday to replace the hideous US spec frog eyes.


And attached my Nurburgring grill badge. And since I have driven the Ring, 3 days in a BMW, I'm not a poseur and have been granted the right by the German government.


The only major mechanical task is hooking up the clutch bits. Then I'll be ready to try to start it. I'm sure I'll have plenty of issues, gremlins, leaks etc to chase down after then. But I'm getting close.

My (Premature) Obiturary

Lots of news organizations maintain pre-written obits so that when a celebrity passes, they open up the file and need to just update a few l...