Showing posts with label painting. Show all posts

Sunday, March 31, 2013

Trailer update

It's raining outside now, the end of a 3 day weekend, but at least it isn't 35 degrees anymore. Starting on Friday we got up into the mid to upper 50's for the first time in months, and it was just in time too. It wasn't a play weekend for me, too much work to do to get ready for race season. Its only 6 weeks away and the clock's ticking.

But here Sunday evening, I think I've finally come out the other side, at least for the trailer rehab. Since the last post, I've been painfully removing all the floor tiles. That wasn't so bad, the bad was once pried up, they left behind a gooey mess.

You can see the tile glue left behind on the plywood

Since then I've mounted all the plywood walls. painted them, cut the trim from a sheet of thin plywood, mounted and painted most of the trim, painted the wheel boxes, and spent hours upon hours scraping up the tile adhesive.


About 2/3 done. The foreground floor is milky looking. That all
leftover glue.


The only thing to do with this is pour on some thick adhesive remover, let it sit for an hour or two, and laboriously scrape the vile mixture off. This was sheer torture for my knees and back and I could only do 2 hour stints at night during the work week. It didn't help that it was 29 degrees outside. Even with my space heater going in the trailer, the cold minimized the effectiveness of the remover.

 The pleasant arrival of warmer weather this weekend helped matters. By Saturday evening, I had all the glue up and the floor washed and cleaned.


Sunday afternoon saw the application of the epoxy flooring well underway. This is a 2 part epoxy from Lowes, used mainly for garage floors but can also be used on wood. I picked a nice dark gray.

Application in progress

The process was to mix the 2 parts in a bucket, stirring with an electric drill for 3 minutes and then the clock was ticking. It had to be applied in the next 3-5 minutes otherwise it would start to harden in the bucket. Luckily the weather was cloudy today and cooler than yesterday which extended the application period.

Once mixed, you pour a line of material and take a squeegee on a pole and squeegee it across the floor to get a nice even thickness. Next take the roller and roll the floor 90 degrees from the squeequee application. Let it setup for 10 minutes and then re-roller. Now you can broadcast the paint flakes into the air. I also added silica as an anti-slip material.

Front done


Close-up of the flake pattern. I used red, white and blue.

View of the finished floor. Those aren't defects in the middle, but
the holes for in-floor tie-downs.


Done. Much nicer than those chewed up checkered tiles. Also did the tailgate.

And about 5 minutes after I finished the last bits, it started raining. Perfect timing. I closed the trailer up and backed it into it's normal spot where it will sit for the next day or two curing.

Still plenty on my to-do list for the trailer. Lots of hours still ahead, but getting the floor done was the biggest item on the list. But for now, I need to drink some beer* and finish up Season 2 of the Game of Thrones. The rest can wait a bit.

* Evolution Rise Up Stout

Sunday, January 27, 2013

Onward into 2013 - 944 update

Welcome readers, all 3 of you, to 2013. While I have been lax with my updates, that's not because I haven't been busy in the garage.

With the '02 driveable - but not finished, I've been running about town and adding to my tick list of things to do which I'm sure will show up here in the future - I've turned my attention to the 944 race car. While the first race is in May, as usual, I have a long list of things planned. New rear rotors went on the car and then after a through inspection I turned my attention to the front.

My major oil leak I had been battling most of last year was identified as 2 sources: a upper balance shaft front seal and a cam tower gasket seal.

Naked Upper Balance Shaft - happy to see someone


As the balance shaft hides behind the belt covers, pretty much the whole front of the engine needs to come off. A couple of nights of labor and it was all back together. Another night for the camtower seal and I was done.

Home of Click & Clack - the Tappet Brothers

After bringing the car up to temp and bleeding the coolant lines (and smoking out the garage from the oil spilled on the headers), my major leak was gone (Yayyy!) but I still had a slow leak from somewhere else (Boooo...) It wasn't the camtower gasket.  I ordered a fluorescent dye kit from Amazon and I'll give it a go when that shows up. Let's keep going.

While a year late, its time for Project Turbo Nose.

I had bought a fiberglass turbo nose a year and half ago with the intention of mounting it last winter. Well the motor rebuild last winter turned to be more time consuming than planned, so much for that idea. I probably wouldn't have finished it anyway, as it turned out I also needed a turbo nose panel, headlight covers and fenders to make a go of it. I scored those bits at the Hershey Swap meet last spring and they have been slumbering in my attic ever since. Their time has come.

First up is removal of the old, banged up bits.


Next it was time for some test fitting of the turbo panels.

MX Blaster tool used to remove the decals
With the panels vaguely fitted, I did a quick sand and prime.


Looking good so far.

The next step to get ready is to make sure the car is straight. Over the last several years the car and driver have been attending the School of Hard Knocks. Notice in the picture above the 2x4 under the front left wheel. Without it I can't get my lift arm under the car, while the other arms fit with no problem. So I'm hauling the 44 up to Bodymotion in North Central New Jersey to have them put it up on their frame bench and apply some auto yoga to it. Gotta get my chakra in tune you know. While it's there, I'm going to have them hang the fiberglass front spoiler for me. I figure as a race shop their welding just might be a little better than mine. I'll do the sanding and painting when it comes back, plus relocate the oil cooler and other bits.

With it and the trailer gone for a couple of weeks, time to work on the '02 again. With winter finally here and salt being put down on the roads, the little bimmer is on vacation back in the garage. And I still have plenty to do.

Monday, August 13, 2012

Filling the hole

Lots of good work this weekend. I even got to buy another tool for the garage, that's always worthwhile.

When we last left off, I was putting lipstick on the pig, aka tarting up my front struts. I'm not touching the internals, that's for the winter, but I was making them pretty for the fall fashion season. The next thing was to clean up and get the subframe ready so I can shove the Porsche turbo motor back into the car. (just kidding)

I'm sure you all think restoring old cars is all cocktail parties and idle chatter while servants in white overalls hand me tools on an engraved platter - "The #3 Phillips, James" - the reality is hanging out in the driveway, scrubbing nooks and crannies with a toothbrush and mineral spirits while the neighbors hoot from their deck: How's that old junker going Cris? It ever going to run again? ha ha...


The reality

A couple of nights in the garage working with some POR-15 and the front subframe is looking pretty good.


After some cleanup, but still pretty tired looking
Almost ready to go

While working on this bit I fought a constant battle against scope creep. Well since you're here, why don't we just do the idler bushing .... And those control arm bushings, I bet they could come off in 5 mins, 10 mins top... Get thee behind me!

The only thing stopping me is the sure knowledge that yeah, they could come off in 5 mins, but then I have to order the parts, wait, and then install then, and since that's off, might as well rehab the control arm, and next thing you know Bob's your uncle!    I mean, the next thing it's December and the car still is in pieces. So I controlled my desires. It's really going to just be a temp rehabbing ... this time. (shhhh... I did re-plate all the sway bar hardware - I couldn't help myself)

Meanwhile, I've been working in the engine compartment, my goal is by the weekend, for it to be filled with mechanical bits.

Engine compartment spiffing up in progress

I installed the new stock firewall pad that's been sitting in my office for the last several months. Next spent time tediously sanding all the brake lines to get rid of the paint overspray. I also touched up all the surfaces where the paint shop guys missed.

Ok, with the destination all prep'd and ready to go, the subframe as rehabbed as it was going to get in this go-round, now's the time. Time to head to Harbor Freight and buy another tool.

1500 lb ATV/Motorcycle (for Harleys) lift

I've done my fair share of jury-rigged engine hoisting assemblies, consisting of collections of mismatched lumber, bungie cords and multiple jacks. And since I have a nicely detailed engine and tranny that will be bolted together to the subframe creating a large amount of mass that wants nothing better than to demonstrate the  non-theoretical application of the law of gravity, I decided it was time to go pro. And considering that any helpers I had will have already gotten into the beer fridge by the time I would be ready ... some mechanical help will be needed. I bought an ATV lift - with a 20% off coupon of course - from the local Harbor Freight.

First the motor needed some final prep. I pulled the upper timing cover and bled the timing belt tensioner piston and re-buttoned it back up. Next the motor was placed into the subframe and bolted up to the motor mounts. With the clutch reattached we were ready for the transmission.

Subframe, motor and clutch in position


Shinny transmission docked


Struts added to make the whole thing unwieldy to handle

The shuttle is approaching the mother-ship

slowly, slowly ....

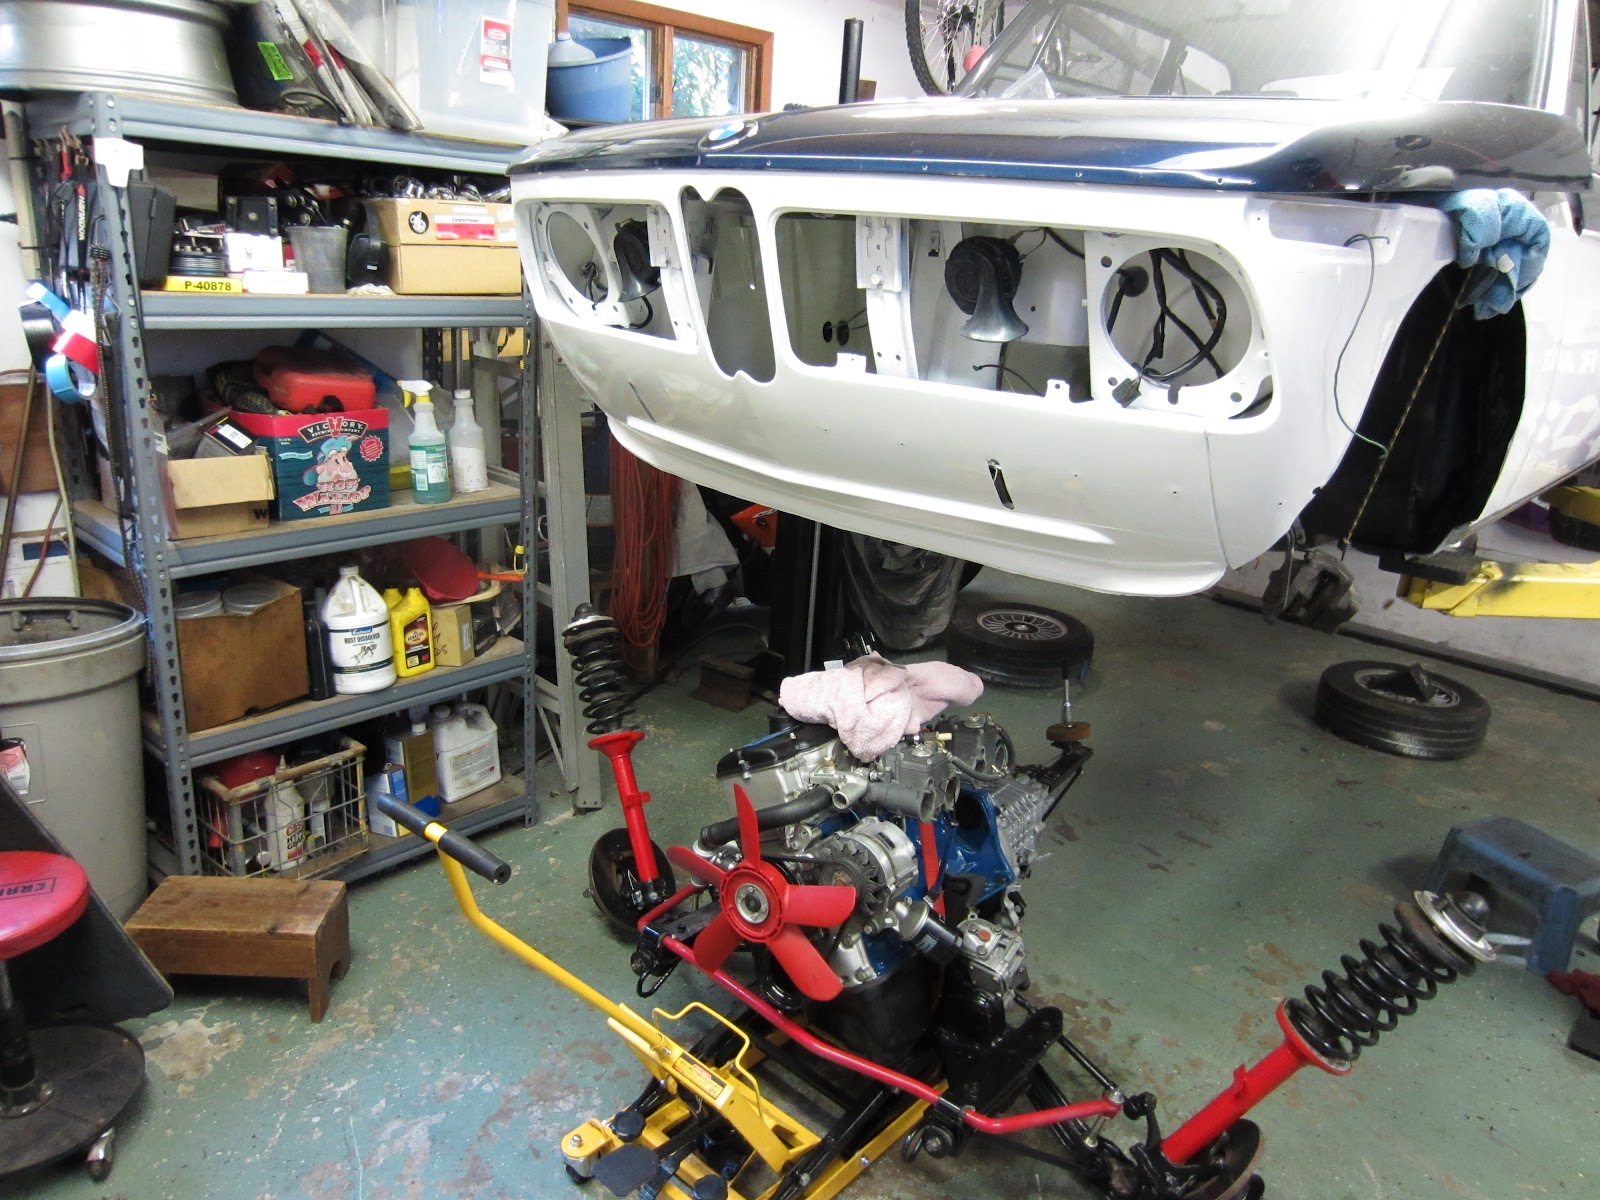
Ta-da! Shuttle is docked.

Back home again, it's been a while ... exactly 7 months ago it was removed.

Just to prove it's not photo-shopped ...

Still a large amount of work to go, but this is a significant milestone. I'm going to go clean up and have a beer. No make that several beers...

Sunday, August 5, 2012

More bimmer progress

I had a good series of races at NJMP last weekend and will get to them in another post shortly. But first some 2002 updates. I've been toiling away in the garage, making good progress. I'm thinking this is the 2nd phase of my '02 ownership. The first was the mechanical reliability phase. I spent the first couple of years just fixing all the little piddly stuff the previous owners ignored or neglected or just screwed up. Eventually I reached a point where the car was reliable and fun to drive. Things like turn signals, heat, etc just worked. That brought me to the 2nd phase where I'm at now: Serious Cosmetic and Mechanical Restoration. I'd say I'm about 85% complete now. Most of the interior is done. I've been working from the back forward and I'm just about ready to start in the motor compartment. The 3rd phase will be suspension replacement and tuning. That will probably take place this winter when my credit cards aren't so tender to the touch.

So lets go show what I've been up to.

The trunk area is done. gas tank connected, rear trim installed, rear "roundie" lights installed and wired. New trunk gasket glued and installed. Trunk panels cleaned and scrubbed.


Next has been the installation of the stainless steel belt-line trim that I was part of the group buy from BMW2002FAQ.com. It took almost 6 months from order to delivery but it's finally here. With the paint job putting the old tired, and dented trim back on was a non-starter. I didn't replace all the trim, that would be several thousands dollars if you can find it, but kept the decent pieces. When painting I had the lower knee trim deleted, so I decided to just replace the belt-line & rocker panel trim and front grilles.


Stainless steel trunk trim installed
new rocker trim in place.

Even though I got rid of the trunk spoiler, I'm keeping the fender flares. I haven't decided on whether to install the front air dam or not. I'm leaning to leaving it off. We'll see.

Fender Flare - original BMW part for the Turbo

Flares installed - New sealing gaskets from Ireland Racing, and stainless
steel install kit from Walloth and Nesch in Germany

As I head toward the front of the car I did a little prep work on some hood hardware.

As removed, old and tired and corroded.


After a trip to the plating station

Installed the door seals. These were a pain in the ass. There's a tiny grooved slot you need to work the seal into otherwise it won't seal correctly. And you can only do about 4-6 inches at a time. You goop up the door and the seal with trim adhesive, wait 10 mins for both to get tacky and then try to fit it all together in the groove and not smear the goop over everything. If your successful, clamp it and go away and wait for it to dry. Then do the next 4 inches. On a good night I might get 12-18 inches done. Luckily I had bought the drivers side seal about a year ago as they are over $200 apiece now and have been on backorder forever.

inch by inch, ....
My old rocker panel trim piece was seriously screwed up so I ended up throwing it away and driving the car without it. That let a nice stream of air in at speed since the door wasn't sealed - made it noisy also. Not so bad in the summer heat, but sucked when it was 35 degrees out. I had Steve at BluntTech send me two new trim strips.

New interior rocker trim

Ok, other than doing something about my dirty headliner I've arrived at the front. First order of business is to drop the subframe because eventually the motor and tranny will be bolted to in and lifted back into the car. But we have some work to do first (of course).

Naked subframe - rated R for rusty.


I unbolted the calipers and hung them from the car, unbolted the shock towers, undid the 6 bolts holding the subframe and lifted the car up into the air leaving the subframe perched on the jack.

Remember Phase III is the Suspension Rehab/Tune and that's scheduled for this winter so I'm not going to go hog wild here. The goal is to clean stuff up I can and get the running gear back into the car and working again. It's been down for 8 months now and I'd like to have it back on the road this fall.

So the plan is to unbolt bits and pieces, knock off the rust, a little paint, a little POR15, reassemble, attach the motor and tranny and stuff. There's still a lot of work ahead without wandering down a sideroad.

Closer view of the subframe, steering box, struts, etc.
Not great, but not too bad either.


Now the struts, that's another story.


Yuck.

I know, I know. I said no scope creep, but I just can't re-bolt those struts back on the car. Just can't do it. Off to the Restoration Chamber!

After some serious wire brushing

Applying lipstick to the pig - aka Rustoleum Safety Red

Okay, they cleaned up nice.
The inserts and springs will have to wait until this winter after I decide what to do with the suspension. I thinking about an Ireland Stage 1 or 2 kit. But at least it will look nice until then.

Now that it's back on the lift, I'll be spending some quality time inside the engine compartment - some paint touchups, re-wrapping the wiring, cleaning up some paint over-spray, etc.

Hopefully my careful labeling of the master fuse panel will pay off as I reconnect everything.


Plenty more work to come but it's all good. My beer fridge is calling my name, telling me it has an Otter Creek Black IPA and a Stovepipe Porter as well.

Friday, April 20, 2012

As Long as We're Here (part 2)


Remember that whole thing about Living in the Land of Well, since we're here ...., and another essay on Scope Creep, all I can say it's way of life.

You would think now that I have my Bimmer back from the paint shop I'd jump right into re-assembling it, but nooooo... That's not the Alpine Garage way.

One minute I'm standing there admiring the shiny exterior and the next, frowning over the carpets. Carpets that only a few months ago seemed perfectly adequate, now looked dirty and worn. Well's there nothing to do but to pull the seats and pull out the carpet. A good washing in the home washer (don't tell Maggie) resulted in a clean, but still stained and faded carpet set.

I sprang into action and ordered a new set from Esty, one of the BMW2002FAQ.com regulars, choosing a nice blue, gray blend to replace the brownish salt & pepper.


And since we're here  .... seats and carpets removed ... now would be great time to put in sound acoustical sound deadening material. Sixties era cars aren't known for their high NVH values and the car is pretty noisy at speed. That is part of its charm of course, but it would be nice to be able to not shout at a passenger or listen to my ipod occasionally.

I cleaned up the tub, removing what's left of the carpet foam and began apply the FatMat RattleTrap barriers that I got off Ebay. This is basically a tar base with a aluminum backing. By applying it to most of the  interior surfaces it should really help the sound quality.


All that brown stuff isn't rust, but carpet glue.


It's applied by cutting pieces from the roll, peeling off the paper backing and then using a wooden roller to bond it to the surface. Tedious but satisfying work.

Tomorrow is the Hershey Swap meet, the largest Porsche swap meet in the US if not the world. I'll be up there early looking to score some turbo fenders and front panels so I can do a turbo nose conversion on my racecar. So far it looks like it might not rain .... so I'm going to retire for the evening and watch Formula One with a nice Yuengling Black & Tan to start.

Thursday, April 5, 2012

Assembly is the Reverse of Removal

Don't you just hate hearing that when you're working on a car task using a Haynes or even a factory manual and have completed something that required major dis-assembly?

To fix x, remove part y. Part y section has 425 steps with 5 pictures in 5 pages for dis-assembly. But just that one liner for putting it all back together.

Well, I'm at that state now. I have the bimmer home from the paint shop, out of the trailer and into the garage. Where it most likely will sit for the next six months except when its pulled and abandoned out on the lawn to fix the racecar.

Home for next several months

It spent 3 months at the body shop. That's at least 2.5 months past my short term memory on how to put everything back together again. Luckily I took about 500 pictures as it came apart, and have a factory manual and have a rabid user community at bmw2002faq.com in case I run into trouble.

That's not dust in the paint but metalflake


I'm still waiting for my stainless steel beltline trim to show up. It's still on the boat from China. But I have a boatload of parts up in my garage attic to spend my time with.

Plus a trunk full


My wife will know where to find me for the next several months. I won't be at the bar hanging around with loose wimmen. I'll still be drinking beer, but in the garage with loose sheet metal. It's all good.

My (Premature) Obiturary

Lots of news organizations maintain pre-written obits so that when a celebrity passes, they open up the file and need to just update a few l...