Showing posts with label vintage cars. Show all posts
Showing posts with label vintage cars. Show all posts
Friday, February 22, 2013
Friday Video: BMW Design Head talks about design
Today's treat is a nice little (7 min) video of the current head of BMW Design, Karim Habib as he talks about his work and design in general. Interestingly, the car he drives is an Inka Orange 2002 Tii (shown driving in the film around Munich). That car still has a hold on the core of BMW. Nice to know.


Wednesday, February 20, 2013
Visiblity mod
As part of the '02 restoration, I replaced the US spec frog eyes front turn signals with Euro turn signals. Not only do they look way cooler, the car is an Euro model so it's only returning back to stock.
One advantage - probably the only - is the US spec turn signals have an extra bulb that lights up - aka parking lights. The Euro ones only have a single bulb, so at night there's only light when the turn signal is activated.
Somebody on the BMW2002FAQ forum came up with a nice mod to add the missing functionality. Start off with a GM right angle license plate socket (Dorman #85868) that I picked up at the local AutoZone.
With a step drill, I drilled an 11/16 hole and mounted the socket to the light bracket.

Since the lights are grounded to the body, I drilled a small hole and mounted the ground lead from the socket with a sheet metal screw.

** Cool Tool Alert ***
While I was in the middle of this mod, I got my Klein Journeyman Crimping Pliers. For years I been using those cheap yellow stamped steel electrical connector crimpers that everybody has. I've never been real happy with their use. It's a crappy tool. While doing the front fog light install, I added a couple of relays and did a fair amount of electrical wiring. In the middle of it I said enough! I'm done with crappy crimps and off to Amazon.com. Well it's finally here, and it's great tool. Expensive ($30) but worth it. Easy, and ergonomic to use and does solid crimps, one after another. Recommended.
And now back to our regularly scheduled blathering ....

 |
| Flat European turn signals |
 |
| Bulbous US spec lights |
One advantage - probably the only - is the US spec turn signals have an extra bulb that lights up - aka parking lights. The Euro ones only have a single bulb, so at night there's only light when the turn signal is activated.
Somebody on the BMW2002FAQ forum came up with a nice mod to add the missing functionality. Start off with a GM right angle license plate socket (Dorman #85868) that I picked up at the local AutoZone.
 |
| I told the car the GM stands for Generalisimo Motors ... |
With a step drill, I drilled an 11/16 hole and mounted the socket to the light bracket.

Since the lights are grounded to the body, I drilled a small hole and mounted the ground lead from the socket with a sheet metal screw.

** Cool Tool Alert ***
While I was in the middle of this mod, I got my Klein Journeyman Crimping Pliers. For years I been using those cheap yellow stamped steel electrical connector crimpers that everybody has. I've never been real happy with their use. It's a crappy tool. While doing the front fog light install, I added a couple of relays and did a fair amount of electrical wiring. In the middle of it I said enough! I'm done with crappy crimps and off to Amazon.com. Well it's finally here, and it's great tool. Expensive ($30) but worth it. Easy, and ergonomic to use and does solid crimps, one after another. Recommended.
 |
| Cheap shitty crimping tool |
 |
| Klien Crimping Pliers - awesome! |
And now back to our regularly scheduled blathering ....
Here's the final result:

Sunday, February 3, 2013
Cool tool of the day: lubricheck
I just got a cool gadget into the garage. It's a Lubricheck, engine oil tester. While you can buy an oil tester like the NASCAR guys use, but they're up around $600-800, not alpine garage money territory. The Lubricheck guys have been developing this for the last couple of years as a Kickstarter project trying to develop one below $50. Well they finally delivered and I got mine in the mail the other day.
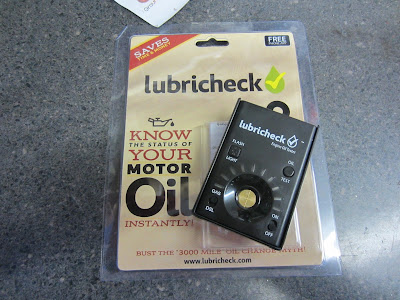
It works by measuring the dielectric and impedance of the oil sample on the sensor in the middle of the device and then shows a rating of the oil from 1 to 10, where 1-7 is good, 8-9 fair, and 10 means the oil time is done. I can use this to measure my oil state before and after every race weekend and know how my oil and also my motor is doing.
It's easy to use, just turn it on, wait for it to calibrate, and then add a droplet to cover the sensor area.
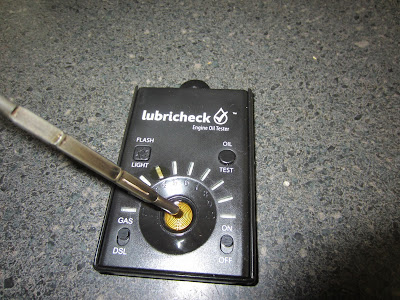
Press the test button and wait for the result.

In this case it's measuring the oil in my BMW 2002, and reported back 8 or fair. Which is probably a good assessment of the quality as it's the break-in oil still in the motor and should be changed shortly.
All in all, it looks like an interesting tool to add to the garage. For more info, check out their website at
www.lubricheck.com

It works by measuring the dielectric and impedance of the oil sample on the sensor in the middle of the device and then shows a rating of the oil from 1 to 10, where 1-7 is good, 8-9 fair, and 10 means the oil time is done. I can use this to measure my oil state before and after every race weekend and know how my oil and also my motor is doing.
It's easy to use, just turn it on, wait for it to calibrate, and then add a droplet to cover the sensor area.

Press the test button and wait for the result.

In this case it's measuring the oil in my BMW 2002, and reported back 8 or fair. Which is probably a good assessment of the quality as it's the break-in oil still in the motor and should be changed shortly.
All in all, it looks like an interesting tool to add to the garage. For more info, check out their website at
www.lubricheck.com
Tuesday, January 29, 2013
Show me the Numbers!
Continuing the theme of late blogging here's some more '02 work done earlier this month.
Not having convenient access to a chassis dyno anymore - they all seem to go out of business - I want some hard data on tuning my car. The car has a pair of big DCOE 45 Weber carbs and running the numbers all my jets, chokes and venturis are probably in the ballpark. And the car is seemingly running well, but how do you really know without numbers or a baseline? Tuning Webers can be an art but I already have a day job and too many hobbies, I don't need an apprenticeship taking several years. I'd rather be driving, racing or drinking beer.
Being a typical American with a short attention span, I want a quicker way to motoring bliss. So I bought an AEM Air/Fuel ratio gauge to help me dial in the motor. They make a nice analog version which complements my vintage style VDO gauges so it doesn't look too out of place. With this I can fiddle with timing, jets and throttle applications and get the numbers. As while your seat of the pants will lie to you, the numbers don't.
I swapped out my existing clock and shuffled the other gauges around. When I'm driving the bimmer I don't really care what time it is. I'm keeping the Oil Pressure and Temps, and the Voltmeter.
First step is wiring it up.
And in a nice gesture to my future senility and/or the next owner, I tagged the wires with their function.

Meanwhile, I took the header to my local muffler shop - Midway Muffler in Elsmere. They work on my racecar exhaust system and are good guys. For $20 they welded a bung to the header for the O2 sensor.

Unfortunately, all the work I did earlier in the year to the header - de-rusting it, painting it with satin black high temp paint - came to naught. Every time I start the car I have to endure a couple of minutes of smoke coming from the headers as they cook off the paint. Plus they are beginning to rust again.

But as usual, I have a plan. They'll be taking a journey down to Crazy Coatings in Middletown, where they'll get bead blasted, and ceramic coated. I'm expecting it to be $250 or less. Take That Rust! Going No Mercy on your ass. Pics when done.
 |
| AEM A/F Ratio analog gauge powering up |
Not having convenient access to a chassis dyno anymore - they all seem to go out of business - I want some hard data on tuning my car. The car has a pair of big DCOE 45 Weber carbs and running the numbers all my jets, chokes and venturis are probably in the ballpark. And the car is seemingly running well, but how do you really know without numbers or a baseline? Tuning Webers can be an art but I already have a day job and too many hobbies, I don't need an apprenticeship taking several years. I'd rather be driving, racing or drinking beer.
Being a typical American with a short attention span, I want a quicker way to motoring bliss. So I bought an AEM Air/Fuel ratio gauge to help me dial in the motor. They make a nice analog version which complements my vintage style VDO gauges so it doesn't look too out of place. With this I can fiddle with timing, jets and throttle applications and get the numbers. As while your seat of the pants will lie to you, the numbers don't.
I swapped out my existing clock and shuffled the other gauges around. When I'm driving the bimmer I don't really care what time it is. I'm keeping the Oil Pressure and Temps, and the Voltmeter.
First step is wiring it up.
 |
| Gauges rat's nest of wiring |
And in a nice gesture to my future senility and/or the next owner, I tagged the wires with their function.

Meanwhile, I took the header to my local muffler shop - Midway Muffler in Elsmere. They work on my racecar exhaust system and are good guys. For $20 they welded a bung to the header for the O2 sensor.

Unfortunately, all the work I did earlier in the year to the header - de-rusting it, painting it with satin black high temp paint - came to naught. Every time I start the car I have to endure a couple of minutes of smoke coming from the headers as they cook off the paint. Plus they are beginning to rust again.

But as usual, I have a plan. They'll be taking a journey down to Crazy Coatings in Middletown, where they'll get bead blasted, and ceramic coated. I'm expecting it to be $250 or less. Take That Rust! Going No Mercy on your ass. Pics when done.
Monday, January 28, 2013
Studs
An ongoing bit has been sorting the suspension of the 2002. The major part so far is the tire and wheels combo. The car as bought came with 13 inch BMW turbine wheels from an E30 with little tiny tires ('quality' US General tires). Try finding decent tires in 13 inches these days, it's slim pickings out there.
Anyway, I wanted something better looking and really liked the look of Minilites/Panasports. They had a nice vintage racy appeal. I ended up buying a set of Rota RB's in gunmetal in 15 inches. They're a popular wheel from Spain with the Minilite look. 15 inches will give me a much greater selection of modern tires.
Complicating matters is the car isn't what you would call stock. With the turbo flares mounted, I'm not restricted to the original mounting and offsets. In fact, if I mounted stock wheels on the car it would look pretty funny, like a clown car, as they wouldn't come close to filling out the flares. And there isn't any guide where I can just go lookup what size wheel I need. I need to measure, fiddle, fuss and guess, and repeat.
After thinking about it for several months, I pulled the trigger and bought the above wheels. They look great and fill out those wheel arches.
Problem is, they rub.
They rub in front, and they rub in back. Now reading the forums, this is liking saying 'hey, the sky is blue'. They all do that with 15 inch tires. The common consensus here is a BFH is your friend. Find out where it's rubbing - use some spray paint as a marker and go for a spirited ride - and then "adjust" the wheel well.
So I been doing a little of that, plus playing with spacers, plus playing with the size of the tires. My local tire guy loves me. At this point I'm getting a volume discount on tire changes. I'm closing in on my perfect tire/wheel/spacer combo but the snow and salted roads are upon us so the research program is on hold.
But while doing my 'research' aka hooning on the local roads, I started worrying about the engagement of my studs and wheel nuts.The wheels have deep socket wells and I'm using spacers so it's hard to gauge how much stud the lug nuts are clamping down on. I decided I would feel better with longer wheel studs. Off to the internet and Ireland Engineering's web page.
A week or two later and I have a set of new studs and lug nuts.

Since the new studs are a bit longer than the original, I couldn't finesse the installation and needed to pull the rear hub.
Using my vise I pounded out the originals with a hammer and with a socket wrench pulled the new ones in.

Of course, we all know the color red makes everything go faster, so I painted the rusty drums with Rustoleum red.

Back on the car ...

The end result.

Yup, safer, subtle and faster. Just the way I want it.
Anyway, I wanted something better looking and really liked the look of Minilites/Panasports. They had a nice vintage racy appeal. I ended up buying a set of Rota RB's in gunmetal in 15 inches. They're a popular wheel from Spain with the Minilite look. 15 inches will give me a much greater selection of modern tires.
 |
| Rota RB's with Kumho AST performance tires. |
After thinking about it for several months, I pulled the trigger and bought the above wheels. They look great and fill out those wheel arches.
 |
| Before the repaint |
Problem is, they rub.
They rub in front, and they rub in back. Now reading the forums, this is liking saying 'hey, the sky is blue'. They all do that with 15 inch tires. The common consensus here is a BFH is your friend. Find out where it's rubbing - use some spray paint as a marker and go for a spirited ride - and then "adjust" the wheel well.
So I been doing a little of that, plus playing with spacers, plus playing with the size of the tires. My local tire guy loves me. At this point I'm getting a volume discount on tire changes. I'm closing in on my perfect tire/wheel/spacer combo but the snow and salted roads are upon us so the research program is on hold.
But while doing my 'research' aka hooning on the local roads, I started worrying about the engagement of my studs and wheel nuts.The wheels have deep socket wells and I'm using spacers so it's hard to gauge how much stud the lug nuts are clamping down on. I decided I would feel better with longer wheel studs. Off to the internet and Ireland Engineering's web page.
A week or two later and I have a set of new studs and lug nuts.

 |
| original stud on left, new one on right |
Since the new studs are a bit longer than the original, I couldn't finesse the installation and needed to pull the rear hub.
 |
| Pulling the hub with my handy dandy Harbor Freight puller |
Using my vise I pounded out the originals with a hammer and with a socket wrench pulled the new ones in.

Of course, we all know the color red makes everything go faster, so I painted the rusty drums with Rustoleum red.

Back on the car ...

The end result.

Yup, safer, subtle and faster. Just the way I want it.
Thursday, December 20, 2012
Xmas comes early for the bimmer
 |
| NOS (New Old Stock) from the 70's |
Last year I scored a set of NOS Black green dot Talbot mirrors on Ebay Germany and they've been calling to me from the shelf ever since.But I was steadfast and wanted to wait until the car was painted and almost done.

Well, that time is now.
Other than being nervous drilling into my freshly painted hood, the install went fairly easy. I've decided I want to go old school and mount them on the hood. This was an option on the earlier 1600's and 2002's and how some of the old timey racers also mounted them.
First I masked my hood area with painters tape, then spent several minutes with the mirrors taped to the hood, checking the sightlines.

Next, following the old carpenter's maxim: Measure twice, cut one. I measured my drill holes - more like 4 times, not twice, and drilled my starter pilot hole, followed by the main hole.
 |
| Drilling in progress |
 |
| Drilling done. |
 |
| Top bracket |
 |
| bottom bracket on the inside of the hood |
and finally slide the mirror onto the bracket.
 |
| Passenger side |
 |
| Driver's side mounted. |
And the view from the cockpit


Happy holidays Bimmer!
Friday, November 30, 2012
A Friday fun video. Here's a 1968 road test of the BMW 2002. Drifting through hairpin cuves in the alps, running laps on a test track, and stuck in a freezer and sprayed with water. I guess I need to go shopping for a suit and tie if I'm going to drive mine.
In Black & White and German of course! Complete with cheesy musical score. Enjoy
Sunday, November 25, 2012
It's Alive!

When last seen, the Bimmer has the motor in place and all the wiring and hoses connected. The last thing to do was finish up the clutch bits. While it seemed to go reasonably well, there was a snag at the end. The clutch fork which the clutch slave cylinder pushes, causing the lever to push the clutch plate just didn't feel right to me. I fiddled and farted with it and was reluctantly coming to the decision that I would have to pull the tranny to find out what was wrong. One step forward, and 2 back. *sigh*
 |
| Slave cylinder (round bit on left) and the clutch fork (black lever going into the tranny on right) |
A lot of forum reading and poring over poor quality transmission diagrams - it is a 40 year old car after all - and I thought I would give it one last shot. Though a combo of flexible mirrors and precariously perched lights I found the spring lever for the fork had come loose and was out of alignment causing my issue. A bit of fiddly blind work had it back in place and with a bleed of the system, I had a working clutch.
Time to work on the 944 and go racing for the next month or two.
And now I'm back.
So for the month of November I've been trying to get the 2002 motor running. It got pulled way back in January for the repaint. The motor was cleaned up and painted, new rod bearings installed, new water pump, new exhaust studs, new hoses, new starter, new gaskets everywhere while waiting for the paint shop to return the car. By April I had the car back from the shop and began the 6 month process of putting it all back together again. With some breaks for 944 Cup racing, the car was mostly done and ready to get back on the street again.
If it would only start ...
 |
| With suspension and wheels, it can be pushed around at least. |
Did the usual checks. A running motor needs 3 things: air, fuel and spark, hopefully all delivered at the right time. Timing light showed I had spark. Full fuel bowls showed I was getting fuel. And air wasn't a problem, so what? Timing?
I pulled the valve cover and manually rotated the crank until the rockers were aligned correctly and I was sure I had TDC on cylinder #1. I made sure the distributor was pointing in the correct location and not 180 degrees out of phase. The timing may not be spot on, but it should be close enough to start. Hmmm.....
Eventually the path of deduction led to the Weber carbs. I had all the correct ingredients, but nothing was cooking. Gas was making it into the carbs, but was it making it out into the intake? A trip to Pep Boys and a can of starter fluid - kids ask your parents - answered that question. A couple of squirts down the carb throats and with a turn of the key, the engine fired up. It didn't sound healthy, but in truth, a diet of starter fluid isn't what it was tuned for. So it's the carbs.
Off with the carbs. Time to dig into them.
A long time ago, actually in February, I 'rebuilt' the Webers.
 |
| In all its greasy, clogged glory. |
 |
| And as cleaned up |
What this meant was clean the outside and repaint, clean all the jets, replace all the gaskets. Kinda like a topend rebuild. Now it was time to get down and intimate with those Italian beauties.
This time I took out all the jets and flushed all the passages with carb cleaning making sure everything flowed where it should. Put it back together and back onto the car. BTW, when I say those 4 little words - back on the car - you should hear in your head 'another 30 minutes of work' - as they came off and on numerous times over the last several weeks. Just sayin'.
So back on the car, a couple of squirts of starter fluid, the turn of the key and Vroom!!!! it's working! Hey wait a minute, it's idling at 4000 rpm. Shit, turn it off! That can't be good for a brand new motor.
So for the next week, time was spent working the high idle problem. Turn the car on, and it would immediately go to 4-4500 rpm. I checked for vacuum leaks and more with no luck. Finally in the middle of one session, the motor screaming at 4500 rpm it just immediately died. Crap! What now? That's electrical, I know the sound of a fuel starved motor. Yup, no spark anymore. Back to square one. That led to several nights of electrical debugging, which was solved by fixing a loose wire on the ignition switch. Damn old cars.
With that fixed, I was back to the 4000 rpm idle motor. More reading, more thinking and Its got to be the throttle plates. Webers back off the car, more cleaning, hey the accelerator pump is stuck, hmm that could be keeping the throttle plate open. Fixed that and 'back on the car'. But before this, I marked the throttle lever and carb body with a red paint dot so I know when the throttle plates are really closed.
And wouldn't you know it. The throttle linkage that connected the dual carbs was out of alignment so when all snugged down, one carb's throttle was open instead of closed shut. Some close personal time with a vise and hammer "adjusted" the linkage so both were closed when they should be. And this is the result of that fine tuning.
Oh yeah, still more work ahead, but that's a major turning point. It's time to celebrate with a beer or two. I just bought some Samuel Smith's Chocolate Stouts and look! they're right here in the garage cooler. How convenient.
Monday, September 3, 2012
Labor Day Weekend
With the rain pouring down in buckets outside the garage, it hasn't been a great Labor Day weekend for outdoor activities. But I occupied myself with the bottomless bucket list of restoration tasks.
I've been motoring along, working in the engine compartment, bolting this bit here, that bit there when I ran into a small detour, typical when restoring a 40 year old vehicle. I had bolted in the upgraded starter and attached the wiring harness. Splitting off the harness was the plug for the alternator at the front of the motor. I couldn't directly see the 3 prongs it plugged into, but I could see the hole surrounding them. I started pushing the plug but instead of that nice smooth tension that tells you it's going well, it started feeling "mushy". I immediately stopped and pulled the plug out. This calls for some up close inspection.
After many years, pulling and inserting plugs, removing and tightening nuts and bolts, there's a very specific feel to the process. And I've learned that any deviation from that feel requires a full stop and lookie. Otherwise, pain, time and money are forecast for the future.
Practicing my yoga skills learned on the internet, I managed to twist my head, droplight and reading glasses into a position where an oblique view showed me the 3 prongs, which should have been parallel to each other, weren't.
Inserting my finger, two of the prongs wiggled. This is not good. The only thing to do is pull the alternator and inspect it on my work bench. A careful inspection showed me the connector wasn't attached anymore and wasn't going to be fixed from the outside. It was time to dive into the mysteries of Alternator repair. This will be a new journey for me.
To repair the alternator, one must first open the alternator. This should have been a relatively straightforward task. It looked like the case was bolted together with 3 long bolts that spanned the case. That was indeed the case, but a more accurate description was 3 long bolts that spanned the case that haven't been turned in 40 years. A large screwdriver did nothing. A even bigger screwdriver did the same. I thought I heard laughter coming from the alternator, but it could be from the TV in corner.
2 days later, after numerous dousings of PB Blaster, heating with a propane torch, a BFH and vice grips, the secrets of the generator were revealed.
Once open it because obvious what was wrong. The connector prongs were on a mounting board that had the alternator brushes attached. And that board had split in half with the brushes on one side and the connectors on another. With a tube of superglue, this was an easy fix and shortly everything was back together again. The brushes looked good, and I relubed the bearings while I was there. And since the overall repair took several days, I went ahead and plated the pulley for extra bling points.
Since there are still many things left to do, I didn't just sit around and watch the PB Blaster work. Next up was the brake booster and master cylinder. This should be reasonably straightforward job with one known pain point, the installation of the "bitch clip".
As it turns out the installation of the infamous clip went relatively smoothly. It connects the brake pedal lever from the cockpit to the actuator rod from the back of the brake booster. The space to work in is very limited and the sequence of actions require force vectors from different directions. Other than dropping the clip a couple of times and having to fish it out with a magnetic stick, it was done in 5 minutes.
What didn't go smoothly was connecting the brake lines to the master cylinder. The first two went easily, lulling me into dropping my guard. And then I heard that laughter again and this time, the TV wasn't on.
Brake lines are flexible steel lines. The ends are flared and there is a knurled bullet shaped bolt/fitting that rides up against the flare and secures the line to the master cylinder. You just start it with your fingers and then tighten it down with a special wrench called a flared wrench. Very similar to a box wrench with a chunk cut out. The chunk allows you to slip the tool past the brake line and then onto the fitting. Since other than the chunk the tool grips the fitting on all sides, you get a nice secure grip and lessen the chance of rounding the fitting, which would really suck.
Like I said, the first two lines, in like Flint, but the 3rd... This was coming up from bottom. See the issue here is, the fitting isn't forgiving or sloppy. Some bolts and holes are loose and you can kinda wiggle to get started. The bolt will catch and automatically straighten up into alignment. This is the "feel" I was talking about earlier with the alternator connector. With the brake lines, the fitting needs to be perfectly perpendicular on all sides to get started and get threaded. With everything bolted and rigid this is an impossible task. So you loosen everything, twist and bend the lines. Since you can't see the line coming into the bottom you fiddle and wiggle, and fiddle some more. You think you get it started, turning one small thread at a time and .... it doesn't catch, it pops out. Brake line #3 took 60 minutes of work over 2 nights. I finally ended upside down in my engine compartment so I can eyeball the alignments. 10-15 minutes for each of the other lines, but it was finally done. You just never know where you're going find problems.
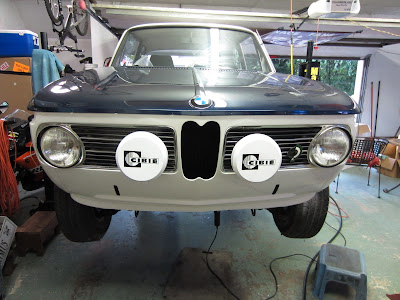
With that behind me, it was time for some fun, brainless activity. I fitted my grills, and the vintage Cibie driving lights. They'll have to come back off when I do the final adjustment of the hood, but they look pretty good.
Attached the Euro spec turn signals Maggie got me for my birthday to replace the hideous US spec frog eyes.


The only major mechanical task is hooking up the clutch bits. Then I'll be ready to try to start it. I'm sure I'll have plenty of issues, gremlins, leaks etc to chase down after then. But I'm getting close.

I've been motoring along, working in the engine compartment, bolting this bit here, that bit there when I ran into a small detour, typical when restoring a 40 year old vehicle. I had bolted in the upgraded starter and attached the wiring harness. Splitting off the harness was the plug for the alternator at the front of the motor. I couldn't directly see the 3 prongs it plugged into, but I could see the hole surrounding them. I started pushing the plug but instead of that nice smooth tension that tells you it's going well, it started feeling "mushy". I immediately stopped and pulled the plug out. This calls for some up close inspection.
 |
| Naked Alternator |
After many years, pulling and inserting plugs, removing and tightening nuts and bolts, there's a very specific feel to the process. And I've learned that any deviation from that feel requires a full stop and lookie. Otherwise, pain, time and money are forecast for the future.
Practicing my yoga skills learned on the internet, I managed to twist my head, droplight and reading glasses into a position where an oblique view showed me the 3 prongs, which should have been parallel to each other, weren't.
Inserting my finger, two of the prongs wiggled. This is not good. The only thing to do is pull the alternator and inspect it on my work bench. A careful inspection showed me the connector wasn't attached anymore and wasn't going to be fixed from the outside. It was time to dive into the mysteries of Alternator repair. This will be a new journey for me.
 |
| Closer view of the misbehaving connector |
2 days later, after numerous dousings of PB Blaster, heating with a propane torch, a BFH and vice grips, the secrets of the generator were revealed.
 |
| The culprit - the brushes and connector |
 |
| In the Repair Booth - calling Dr SuperGlue ... |
 |
| Good for another 40 years |
 |
| Project deviation finished, back on track |
Since there are still many things left to do, I didn't just sit around and watch the PB Blaster work. Next up was the brake booster and master cylinder. This should be reasonably straightforward job with one known pain point, the installation of the "bitch clip".
As it turns out the installation of the infamous clip went relatively smoothly. It connects the brake pedal lever from the cockpit to the actuator rod from the back of the brake booster. The space to work in is very limited and the sequence of actions require force vectors from different directions. Other than dropping the clip a couple of times and having to fish it out with a magnetic stick, it was done in 5 minutes.
What didn't go smoothly was connecting the brake lines to the master cylinder. The first two went easily, lulling me into dropping my guard. And then I heard that laughter again and this time, the TV wasn't on.
 |
| Brake booster - large round device bottom right, master cylinder is the long cylinder in the middle. Brake lines attach to the sides and bottom. |
Like I said, the first two lines, in like Flint, but the 3rd... This was coming up from bottom. See the issue here is, the fitting isn't forgiving or sloppy. Some bolts and holes are loose and you can kinda wiggle to get started. The bolt will catch and automatically straighten up into alignment. This is the "feel" I was talking about earlier with the alternator connector. With the brake lines, the fitting needs to be perfectly perpendicular on all sides to get started and get threaded. With everything bolted and rigid this is an impossible task. So you loosen everything, twist and bend the lines. Since you can't see the line coming into the bottom you fiddle and wiggle, and fiddle some more. You think you get it started, turning one small thread at a time and .... it doesn't catch, it pops out. Brake line #3 took 60 minutes of work over 2 nights. I finally ended upside down in my engine compartment so I can eyeball the alignments. 10-15 minutes for each of the other lines, but it was finally done. You just never know where you're going find problems.
With that behind me, it was time for some fun, brainless activity. I fitted my grills, and the vintage Cibie driving lights. They'll have to come back off when I do the final adjustment of the hood, but they look pretty good.
|
| With H4's and the Cibie's, I should be throwing down some serious light power |
Attached the Euro spec turn signals Maggie got me for my birthday to replace the hideous US spec frog eyes.

And attached my Nurburgring grill badge. And since I have driven the Ring, 3 days in a BMW, I'm not a poseur and have been granted the right by the German government.

The only major mechanical task is hooking up the clutch bits. Then I'll be ready to try to start it. I'm sure I'll have plenty of issues, gremlins, leaks etc to chase down after then. But I'm getting close.
Subscribe to:
Posts (Atom)
My (Premature) Obiturary
Lots of news organizations maintain pre-written obits so that when a celebrity passes, they open up the file and need to just update a few l...

-
 Hanging out in a Yurt in Tibet with the Golok nomads. Drinking Barley Tea, heated by burning dried yak turds. Some temple details. This wa...
-
 Nothing like suffering through the Philly Love Run Half Marathon and vowing never to do it again, and then signing up for another Half. Ye...
-
 Other than making zoom-zoom noises I'm a pretty useless motor When we last left off, I was young, full of unwarranted optimism, eager ...