Tuesday, January 31, 2012

At the Paint Shop

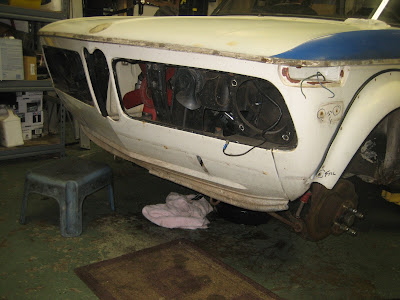
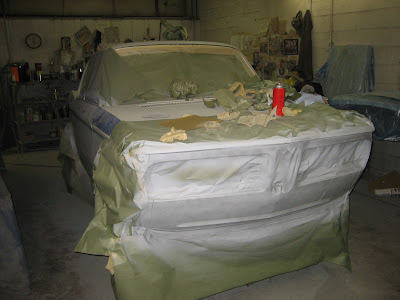
I sneaked over to the paint shop Monday evening to check out the progress on the bimmer. They were about to close and Charlie Jr. wasn't around so I only had time to grab a few pictures and didn't chat with anybody.


They haven't gotten to the hood yet.


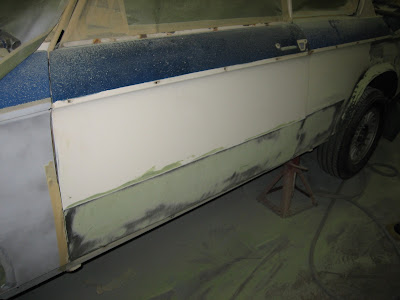
Passenger side

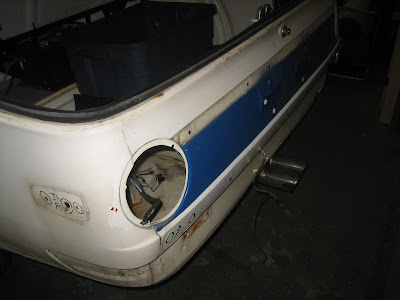
Trunk spoiler was glued down and didn't come off willingly.

Driver's door needed more repair than we thought. Whole bottom panel was replaced.

Monday, January 30, 2012

Clean up continues

One of the less glamorous tasks in vintage car restoration is cleaning all the myriad bits and pieces, large and small, prepping them and then applying a suitable finish - whether that's painted, blasted or electroplated. If I had a shop do all this work, this would be a $100K BMW worth only $15K. Luckily for me, and lots of other hobbyists, I find the work reasonably pleasurable so it has other values than just a cost basis.

This weekend was the 50th running of the 24 Hours of Daytona. I spent the weekend in the garage attending to some of these tasks while listening and watching the race.

Here's the motor and tranny as removed. Since then, the tranny has been pulled and the motor put into an engine stand. Lot's of hardened, baked grease, rusty bits and more need to be addressed, or this will be an eyesore in the newly painted engine compartment. Besides I love a nice looking engine.


The before picture


This is where I am after several hours of working on the tranny. Transmissions and engine blocks are a pain in the ass as they have all these nooks and crannies and weird castings. All of them need to cleaned up. This is done patiently with a small tools, mineral spirits and elbow grease. The constant inhalation of the mineral spirit fumes help achieve the proper mental state for this work.


scrub, pick, scrape, wipe, repeat ...

Mostly clean now, but there was a nasty 40 year accumulation of caked grease on the inside.


Not done yet, but some Eastwood engine block paint applied to the main case. Looking shiny and clean for a change.


A couple more hours, and a refresh of the fluid with some Redline MTL and we'll be done with the tranny.  While I was waiting for the paint to dry I started cleaning the block.  Here's my starting point after 10 minutes scrubbing. Lot's of work ahead here.


Under the dirt and oil, the block is blue. When we're done it should match the outside paint scheme.

Done earlier was the radiator. Other than the beat up paint, it was in excellent shape. A bunch of sanding down to the original brass, and then several coats of Eastwood radiator black paint had it looking sharp.


You can still see the original serial number stamping.

The rest of the week I'll be finishing up the tranny and will start taking the motor apart. Should be interesting.

Friday, January 27, 2012

Rust Be Gone

While the bimmer is off at the shop and I'm waiting for my engine rebuild kit, I'd thought I devote some attention to accessory bits, like the header.

Before the motor drop, header at bottom

As you can see it's solidly rusted and a nice color if you're a guardrail in a scenic national park. I can't afford to pop for one of the Ireland Engineering stainless steel headers, so let's see if we can resurrect this one.


Perusing the Eastwood catalog for restoration supplies I came across their Rust Dissolver product.

The product picture is a rusty header being cleaned. Reviews have generally been positive so I decided to give it a try.


A closer view of what we are working with.


The results after a night in a bucket in the garage. The garage isn't heated, so I'm working at the bottom end of the recommended temp range. It's more of a thin gel instead of a liquid at this point which since I don't have a large narrow and long tub to soak in is a plus. Just takes longer. And time is free.


Not too bad. This stuff really works. Mild smell, non-toxic, doesn't burn the hands. Good stuff.

A couple of nights later it's looking pretty good. The only physical labor is scrubbing it off in the tub. No power tools, no hand sanding. Better living through chemistry.


And the final result after several coats of high temp satin black paint. This should look good in the engine compartment when done.


Saturday, January 21, 2012

Tools

I have a confession to make: I'm a tool user. And possibly a tool geek.


It's not something you would admit in public, like at a cocktail party, or at a PTA meeting. But if you're reading this, chances are you have the same "inclination".


So what is a tool? From Wikipedia we find: "A tool is a device that can be used to produce an item or achieve a task, but that is not consumed in the process. ...Tools are the most important items that the ancient humans used to climb to the top of the food chain; by inventing tools, they were able to accomplish tasks that human bodies could not, such as using a spear or bow and arrow to kill prey, since their teeth were not sharp enough to pierce many animals' skins.


I got to thinking about tools the other day when, due to the lack of a proper one, I was frustrated in "achieving my task". Luckily technology has advanced so that I generally don't need to create my own tools, I can just zip down to my local Harbor Freight or Sears Hardware and purchase one.


So big deal, everybody uses tools. A car is a tool that transports humans from one place to another. A bowl and spoon are tools for eating Grape-nuts in the morning. My racecar is a tool to (hopefully) win races or catch on fire. If you're human and alive, you're using tools. What slides this normal process toward the beginnings of geekness is the derivation of pleasure in viewing and most of all, in the use of a well designed tool. For most people, the tool is secondary to their task. Assembling an IKEA bookshelf they grab the cheap phillips screwdriver they keep in a drawer that they received when they bought 25 gallons of gas one day, or the pliers that came as a 14.99 auto repair kit Xmas gift. This often leads to an unsatisfactory experience, rounding the head of the screws, etc. 


But for a true tool geek, using a good tool is a sublime experience, that not only "achieves the task", but enhances it. A good tool typically is dedicated to one purpose. While a Leatherman multi-tool can be useful and functional in many situations, it's very nature compromises and dilutes the tool experience. I admit I own multi-tools, such as screwdrivers with multiple bits stored in the handles and the like. And they are useful in normal day to day activities. But when it comes to an important mechanical task, I also own several full sets of screwdrivers, each one dedicated to one particular task. The selection of the proper tool for a job, involves an endless set of factors, of which is outside of scope for this. But when the right tool is selected, and bought to bear on the problem, a well designed tool melds the user and the activity together. It's subtle, but definitely there. 


The Wiki article on tools got me to pondering the evolution of a another set of tools I have been using for many years, my ice axes. This is, after all, the "Alpine" Garage.


1970's ice axe technology


I started climbing back in the 70's. Just like everything else, technology was starting to touch this area of human activity. Unlike Rock climbing, where the tools (harness, rope, carabiners, chocks) are secondary, used for safety and backup only, in Ice climbing, tools are an essential component of the sport and play a huge role. As ice climbs become steeper, approaching and exceeding vertical, tools are necessary. No ice axes == staying on the ground. This focus on tools as part of the sport was one that attracted me.


In the picture above is state of the art technology for the 1970's. The bottom tool is a Mountain Technology ice axe from Scotland. This is a general purpose tool, patterned on the same technology all the way back to the 1800's. Edward Whymper climbing the Matterhorn in 1865 would have immediately recognized it. But even here we are seeing stirrings of technology creeping in. The tool is much shorter than a typical ice axe, allowing it to be swung above the head like a hammer, allowing steeper terrain to be attacked. The shaft is no longer wood, but metal, and coated with rubber, affording a better grip.


The top tool is a Lowe Hummingbird hammer. One side is a hammer head for banging in screws to vertical ice. The other side carries a drooping pick for lodging into the ice. Compare the tool to the Mountain Tech below. It's shorter more compact, no spike in the bottom handle, the pick is straight and sharply angled down. This is a specialist tool, useless for tromping along a glacier, but superb for attacking frozen waterfalls.


While the Hummingbird is relegated to the back of the closet, the Mountain Tech axe is a timeless design, like a good vintage car, and is still brought out to occasionally play in the mountains. 


The Reagan era, the 1980's 

Here's my tools from the 1980's, a pair of Chouinard X ice axes. Technology is fully in play here now. Both axes are much shorter, thus becoming less useful in general mountaineering, only useful on nearly vertical terrain. The heads are forged, not cast and feature a locking system for mounting different picks depending on the ice conditions. The shafts are hollow steel and lighter. The leashes are designed to lock the hands on the shafts giving better grip, but also release to slide up the shaft for flexibility. These were good designed tools that I used successfully for many years. 


The Internet arrives, the 1990's


Now we move into the realm of totally specialist tools. These are Charlet Moser Quasars, the hot tool of the 90's. The first time I swung these tools into steep ice I was in love. The perfect example of all the components for human/tool unity. Light weight to reduce fatigue, but still heavy enough in the head to penetrate the ice. Notice the curved shaft which allowed full swings over edges without bashing your knuckles, a common occurrence on straight shafted tools. The head was fully modular to accept different picks, hammer heads, aze heads and the like. Grippy rubber at the bottom of the tool with a slight bump to settle the little finger of your hand on. They were a delight to use. After a few whacks into the ice, they disappeared as separate objects and became extensions of my body, manifestations of my desire to ascend upward. No greater compliment can be given to a tool than to become so invisible that they become expressions of your will.


My tool of choice today - Black Diamond Cobras


While the Quasars were the perfect tool for me and great technology, ice climbing is a sport, and just as the tools evolved, the sport itself evolved. As the tools got better, the challenges became diminished. Feats that were impossible years ago, become commonplace. Once the limit was a 50 degree snow slope, today vertical and even overhanging ice is considered routine and accessible by any reasonably fit athlete. Up until the mid 2000's, climbing ice meant attaching yourself to your tools with some sort of leash. The leashes were used to hang from your tools so you didn't have depend on having death grip on the handle. Often during a ice climb you needed to remove your hands from the leash to place ice screws and other protection, so elaborate locking and caming systems were devised for the leashes. One day somebody thought, Why don't we just get rid of the leashes? 


And so a new chapter was born in the sport. My current tools, the BD Cobras, are very similar to my Quasars, but adapted for the new world of leashless climbing. When you have a good tool design, stick with it. Once again this is a highly focused, specialized tool design. Crafted with carbon fiber shaft and forged heads, they are immediately recognizable by a tool geek. Even if you have no desire to set a pick into a frozen waterfall, the visual appeal, the craftmanship, the purposefulness, the feel as you pick up the tool, all bring a smile to a discerning tool user. And that's another mark of well crafted tool, the purity of its design will come through.


Thursday, January 19, 2012

Off to Paint Land

Doesn't look so pretty now, does it?

Finished up the final prep work before the trip to the paint shop. Rear quarter windows were pulled and the trim's rivets drilled out to remove the window trim. The shop will pull the windshield before painting.

Rear windows and most of the interior removed


Rear flares off. The original install was pretty nice with welded flares underneath.


Some minor rust but generally quite solid


The driveshaft under the car was suspended from my seatbelt brackets so I could roll the car around. The bungee cord is a specially built motorsports version only available to licensed racers.


The final touches to the engine compartment: Fuse box pulled, along with wiring and relays. Master cylinder and brake booster removed. Fuel lines, water hoses, washer hoses and nozzles gone. The battery box in the lower right will be cut out since the battery was relocated to the trunk.


Pretty greasy and dirty now, but just wait

Finally it's ready for the shop. I delivered my 944 down to Behe's shop in Maryland for some work and when I came back, my neighbor and Edward Moore helped push the roller into the trailer. An hour later it was at its new home, Northeast Auto Body, for the next several weeks.  Hopefully we have some pics of progress to come.


Bimmer Motor Finally Out

Well, that was a pain. All told, about 2 days of work. Of course the first time you do any of this car stuff, it always takes forever. It will take 1/2 the time the next time - not that there is going to be a next time!

Glad to have a lift!

Most of it was pretty straight forward, disconnect everything. Major time sinks were the removal of the clutch slave from the transmission - I left the tranny attached to the motor. This should have taken 5 mins but ended up taking 2 hours, which included a run to the Sears hardware to buy a new snap-ring plier as mine when expanded was about 1/4 inch too short to pull the ring off. I persevered mightily for about a half hour before giving up. Once I had the proper tool, it took 5 minutes. Just goes to show you, proper tools make all the difference.

Motor and tranny hanging from the engine hoist after being plucked from the suspension

The next major hangup was the header. The plan was to drop the subframe with the motor and suspension attached through the bottom. I had pulled everything, removed the subframe bolts and was slowly lowering the assembly when it bound up tight between the frame rails. Argghh!

"The headers need to be removed. "

Just 6 words but it lead to a couple of hours work. An engine hoist, vehicle lift, several jacks, liberally applied verbal lubrication, hand tools and a small amount of beer were all involved according to witnesses. But the deed was done and no small animals were harmed in the process. Once out, the motor was attached to a engine hoist and yanked off the subframe and suspension to be ignored until later.

Naked subframe - a whole nother restoration area for the future.

The subframe and suspension were bolted back into the car, wheels added and we had a roller. Almost ready for the paint shop.

Still more work to do, but the end (of this phase) is in sight.

Tuesday, January 10, 2012

Time for a change of pace


As 2011 came to a close, I had a bit of a setback with the 944. I had buttoned the new motor into the car and was ready to move onto the host of other items I planned for the coming season. I ran the motor for a half hour to bring it up to temp and bleed the coolant. As the temps came up, the oil pressure started dropping. Not usually a concern. As the oil heats up, it starts to thin out a bit. Idling at 1000 rpm, it was showing 3 bars. Then 2 bars. Blipping the throttle to 4K would bounce the pressure back up to 4.5 bars and life was good. But I wasn't getting off that easy.

Soon it dropped to 1.5 bars at idle, and blipping the throttle would only go to 3, then 2 and then no effect. Shit! Shut it down and regroup.

Thinking and talking to some engine folks, and the consensus was either OPR value or still some shavings from the rod bearing failure clogging up the oil system. Draining the oil I found some small metal flakes on the drain plug magnet. So the only course of action was to to, of course, pull the motor. Man I'm glad I'm being paid by the hour for this crap!

Out again, hopefully for the last time in 2011.

 I found some rod bearing flakes on the oil pickup. I pulled the bottom end and the oil cooler off. Threw the oil cooler in the trash and found a slug of flakes blocking the OPRV. Replaced that too. To play it safe I pulled the main cradle and checked the main and rod bearings and clearance. The mains looked fine, but one of the rod bearing was lightly scored, so replaced all of them again. Checked all the passages with compressed air and a magnet, and it looked good, so I put it back together again.

Crankshaft and mains exposed.

Adding the high dollar Locktite sealant to the crank cradle

With the lump back in the car, fluids topped off, DME relay pulled and coil disconnected - a short sentence, but 4 hours of work - I cranked the starter, and within a few seconds, I had 5 bars of oil pressure. Excellent, first time that has ever happened to me without having to fire the motor. I connected the ignition bits and it fired right up. 40 minutes later, the coolant was bled, and I still had great oil pressure. I think I turned the corner.

Of course, for the next week, I would sneak out to the garage at night and start the motor and let it run for a bit, "just to take a look". So far so good, I'm starting to believe. So now its buttoned up in the trailer, ready to go to John Behe's shop, for a break-in on the dyno and a tuning session.

So with that behind me it was time for something else on my garage to do list.

First up was a new radiator for the Subie. With the 944 taking up my lift, I had farmed out a new clutch job to the local Subaru dealer.It was gone and I just didn't have the time or lift for it. While it was there, the Service Rep called me up and told me my radiator was leaking and needed replacement. Also said in an accusatory tone: Somebody put a "aftermarket" radiator in the car. I let this sink in for a bit, and then said that "Somebody" was you, the dealer. You replaced it about 2 years ago! Oh, she said, and then, but that doesn't matter, it's out of warranty anyway. I declined the extra $600 to be added to my bill.

I ended up finding the best price on Amazon of all places and one afternoon went to work.

A true Aftermarket radiator. Pretty nice aluminum piece, much better than stock.

Rad and new hoses in place.

For good measure, I added a set of silicon hoses. A couple of easy hours work and I saved $300 bucks from the dealer price and have a much better product. I should be good for another 120K miles.

Which brings us to the project pictured at the top of this entry. After owning the 1970 BMW 2002 for several years, and generally restoring the mechanical bits, it was time to make it purdy.

Last weekend I started on the disassembly and engine removal. Pulling motors is what I do!


I'm having the car repainted. Along with the painting, there some minor rust repair, shaving of the US markers, the lower side trim and I want the engine compartment painted too. So all the trim and the motor need to come off or out.

To have a hope in hell of putting it all back together again, I'm taking lots and lots of pictures.

typical photo, this is the throttle rod assembly.

Motor about ready to come out.

I'll be pulling the motor from the bottom, disconnecting all the misc bits, and then dropping the suspension with the motor and tranny still attached. Slide the assembly out from front of the car,  pick the motor off and put it on the stand, reattach the suspension and done. Same process I used to do with my 944 motors. I ran out of time last weekend, but am close. I'll wait until the weekend and daylight hours to finish it up. Meanwhile I am pulling all the trim off. That's enough to keep me busy after work.
Bumper, lights and rear trim all gone.

Rear seats and interior panels had to go to get to bolts holding side trim.

Front turbo spoiler, grilles and headlights gone. hood trim also.

Notes to the body shop. This is the front fender where there was US reflectors attached when the car was imported. They are going and the holes welded over.

My (Premature) Obiturary

Lots of news organizations maintain pre-written obits so that when a celebrity passes, they open up the file and need to just update a few l...