Monday, September 3, 2012

Labor Day Weekend

With the rain pouring down in buckets outside the garage, it hasn't been a great Labor Day weekend for outdoor activities. But I occupied myself with the bottomless bucket list of restoration tasks.


I've been motoring along, working in the engine compartment, bolting this bit here, that bit there when I ran into a small detour, typical when restoring a 40 year old vehicle. I had bolted in the upgraded starter and attached the wiring harness. Splitting off the harness was the plug for the alternator at the front of the motor. I  couldn't directly see the 3 prongs it plugged into, but I could see the hole surrounding them. I started pushing the plug but instead of that nice smooth tension that tells you it's going well, it started feeling "mushy". I immediately stopped and pulled the plug out. This calls for some up close inspection.

Naked Alternator 

After many years, pulling and inserting plugs, removing and tightening nuts and bolts, there's a very specific feel to the process. And I've learned that any deviation from that feel requires a full stop and lookie. Otherwise, pain, time and money are forecast for the future.

Practicing my yoga skills learned on the internet, I managed to twist my head, droplight and reading glasses into a position where an oblique view showed me the 3 prongs, which should have been parallel to each other, weren't.

Inserting my finger, two of the prongs wiggled. This is not good. The only thing to do is pull the alternator and  inspect it on my work bench. A careful inspection showed me the connector wasn't attached anymore and wasn't going to be fixed from the outside. It was time to dive into the mysteries of Alternator repair. This will be a new journey for me.

Closer view of the misbehaving connector
To repair the alternator, one must first open the alternator. This should have been a relatively straightforward task. It looked like the case was bolted together with 3 long bolts that spanned the case. That was indeed the case, but a more accurate description was 3 long bolts that spanned the case that haven't been turned in 40 years. A large screwdriver did nothing. A even bigger screwdriver did the same. I thought I heard laughter coming from the alternator, but it could be from the TV in corner.

2 days later, after numerous dousings of PB Blaster, heating with a propane torch, a BFH and vice grips, the secrets of the generator were revealed.

The culprit - the brushes and connector

In the Repair Booth - calling Dr SuperGlue ...
Once open it because obvious what was wrong. The connector prongs were on a mounting board that had the alternator brushes attached. And that board had split in half with the brushes on one side and the connectors on another. With a tube of superglue, this was an easy fix and shortly everything was back together again. The brushes looked good, and I relubed the bearings while I was there. And since the overall repair took several days, I went ahead and plated the pulley for extra bling points.

Good for another 40 years

Project deviation finished, back on track

Since there are still many things left to do, I didn't just sit around and watch the PB Blaster work. Next up was the brake booster and master cylinder. This should be reasonably straightforward job with one known pain point, the installation of the "bitch clip".

As it turns out the installation of the infamous clip went relatively smoothly. It connects the brake pedal lever from the cockpit to the actuator rod from the back of the brake booster. The space to work in is very limited and the sequence of actions require force vectors from different directions. Other than dropping the clip a couple of times and having to fish it out with a magnetic stick, it was done in 5 minutes.

What didn't go smoothly was connecting the brake lines to the master cylinder. The first two went easily, lulling me into dropping my guard. And then I heard that laughter again and this time, the TV wasn't on.

Brake booster - large round device bottom right, master cylinder is the
long cylinder in the middle. Brake lines attach to the sides and bottom.
Brake lines are flexible steel lines. The ends are flared and there is a knurled bullet shaped bolt/fitting that rides up against the flare and secures the line to the master cylinder. You just start it with your fingers and then tighten it down with a special wrench called a flared wrench. Very similar to a box wrench with a chunk cut out. The chunk allows you to slip the tool past the brake line and then onto the fitting. Since other than the chunk the tool grips the fitting on all sides, you get a nice secure grip and lessen the chance of rounding the fitting, which would really suck.

Like I said, the first two lines, in like Flint, but the 3rd... This was coming up from bottom. See the issue here is, the fitting isn't forgiving or sloppy. Some bolts and holes are loose and you can kinda wiggle to get started. The bolt will catch and automatically straighten up into alignment. This is the "feel" I was talking about earlier with the alternator connector. With the brake lines, the fitting needs to be perfectly perpendicular on all sides to get started and get threaded. With everything bolted and rigid this is an impossible task. So you loosen everything, twist and bend the lines. Since you can't see the line coming into the bottom you fiddle and wiggle, and fiddle some more. You think you get it started, turning one small thread at a time and .... it doesn't catch, it pops out. Brake line #3 took 60 minutes of work over 2 nights. I finally ended upside down in my engine compartment so I can eyeball the alignments. 10-15 minutes for each of the other lines, but it was finally done. You just never know where you're going find problems.

With that behind me, it was time for some fun, brainless activity. I fitted my grills, and the vintage Cibie driving lights. They'll have to come back off when I do the final adjustment of the hood, but they look pretty good.

With H4's and the Cibie's, I should be throwing down some serious light power


Attached the Euro spec turn signals Maggie got me for my birthday to replace the hideous US spec frog eyes.


And attached my Nurburgring grill badge. And since I have driven the Ring, 3 days in a BMW, I'm not a poseur and have been granted the right by the German government.


The only major mechanical task is hooking up the clutch bits. Then I'll be ready to try to start it. I'm sure I'll have plenty of issues, gremlins, leaks etc to chase down after then. But I'm getting close.

Tuesday, August 28, 2012

A nice surprise

After work I slipped down to the garage to work on the '02. I didn't feel like launching into a major activity like attaching the clutch slave or brake booster. But no worrry, there's still a thousand piddly little tasks to finish up.

I picked up a box from the attic with random parts, and there were the window wipers. Ok, a simple brainless task, let's put them on. One more thing off the checklist. But as I'm examining them, I notice specks of shiny color coming through the black. Hmmm... the original wiper arms for the early cars was chrome or stainless steel. It wasn't until the later car were they black. I wonder, if when they went for the turbo look, if somebody painted them?

Got my trusty can of carb cleaner and a rag and a few seconds of work showed me this.

hidden treasure

Yeah baby. I grabbed my can of acetone and a chemical mask and went to work. Here's the end result.


Awesome, they look great. That was totally unexpected.

Over the last weekend I made some good progess on some larger tasks.

The driveshaft was connected, so now the car can be pushed around. Very important as I'm still in race season and can't have my lift tied up.


Got the headers installed and connected to the exhaust. Added a E30 series heat shield between the plugs and header, a popular upgrade. Did plugs and wires and hung the coil.  Installed the radiator and started working on the water hoses.


Worked on running the wiring harness, and support pieces for the Weber throttle bits. Hooked up the fuel lines.


 Installed the H4's and custom brackets for the vintage Cibie driving lights.


POR15'd the brake booster in preparation. I had refinished it last year with Rustoleum enamel but it didn't hold up to the brake fluid. We'll see how the POR15 works out.


Lastly, but not least. Here's some trick upgrade parts that are soon to go in.


An new upgraded starter for a 5 series BMW. This is a bolt in upgrade. Just below that is a custom made stainless steel throttle rod fitted with heim joints. This will remove any slop in the stock throttle rod and looks trick in the process. Just below that is a flexible clutch slave fluid line. No great performance advantage, but working with the stock non-flexible line is a huge PITA. This is a major improvement.

So that's where I am so far. Being that I have no fixed date to finish, the project is right on track.

Monday, August 13, 2012

Filling the hole

Lots of good work this weekend. I even got to buy another tool for the garage, that's always worthwhile.

When we last left off, I was putting lipstick on the pig, aka tarting up my front struts. I'm not touching the internals, that's for the winter, but I was making them pretty for the fall fashion season. The next thing was to clean up and get the subframe ready so I can shove the Porsche turbo motor back into the car. (just kidding)

I'm sure you all think restoring old cars is all cocktail parties and idle chatter while servants in white overalls hand me tools on an engraved platter - "The #3 Phillips, James" - the reality is hanging out in the driveway, scrubbing nooks and crannies with a toothbrush and mineral spirits while the neighbors hoot from their deck: How's that old junker going Cris? It ever going to run again? ha ha...


The reality

A couple of nights in the garage working with some POR-15 and the front subframe is looking pretty good.


After some cleanup, but still pretty tired looking
Almost ready to go

While working on this bit I fought a constant battle against scope creep. Well since you're here, why don't we just do the idler bushing .... And those control arm bushings, I bet they could come off in 5 mins, 10 mins top... Get thee behind me!

The only thing stopping me is the sure knowledge that yeah, they could come off in 5 mins, but then I have to order the parts, wait, and then install then, and since that's off, might as well rehab the control arm, and next thing you know Bob's your uncle!    I mean, the next thing it's December and the car still is in pieces. So I controlled my desires. It's really going to just be a temp rehabbing ... this time. (shhhh... I did re-plate all the sway bar hardware - I couldn't help myself)

Meanwhile, I've been working in the engine compartment, my goal is by the weekend, for it to be filled with mechanical bits.

Engine compartment spiffing up in progress

I installed the new stock firewall pad that's been sitting in my office for the last several months. Next spent time tediously sanding all the brake lines to get rid of the paint overspray. I also touched up all the surfaces where the paint shop guys missed.

Ok, with the destination all prep'd and ready to go, the subframe as rehabbed as it was going to get in this go-round, now's the time. Time to head to Harbor Freight and buy another tool.

1500 lb ATV/Motorcycle (for Harleys) lift

I've done my fair share of jury-rigged engine hoisting assemblies, consisting of collections of mismatched lumber, bungie cords and multiple jacks. And since I have a nicely detailed engine and tranny that will be bolted together to the subframe creating a large amount of mass that wants nothing better than to demonstrate the  non-theoretical application of the law of gravity, I decided it was time to go pro. And considering that any helpers I had will have already gotten into the beer fridge by the time I would be ready ... some mechanical help will be needed. I bought an ATV lift - with a 20% off coupon of course - from the local Harbor Freight.

First the motor needed some final prep. I pulled the upper timing cover and bled the timing belt tensioner piston and re-buttoned it back up. Next the motor was placed into the subframe and bolted up to the motor mounts. With the clutch reattached we were ready for the transmission.

Subframe, motor and clutch in position


Shinny transmission docked


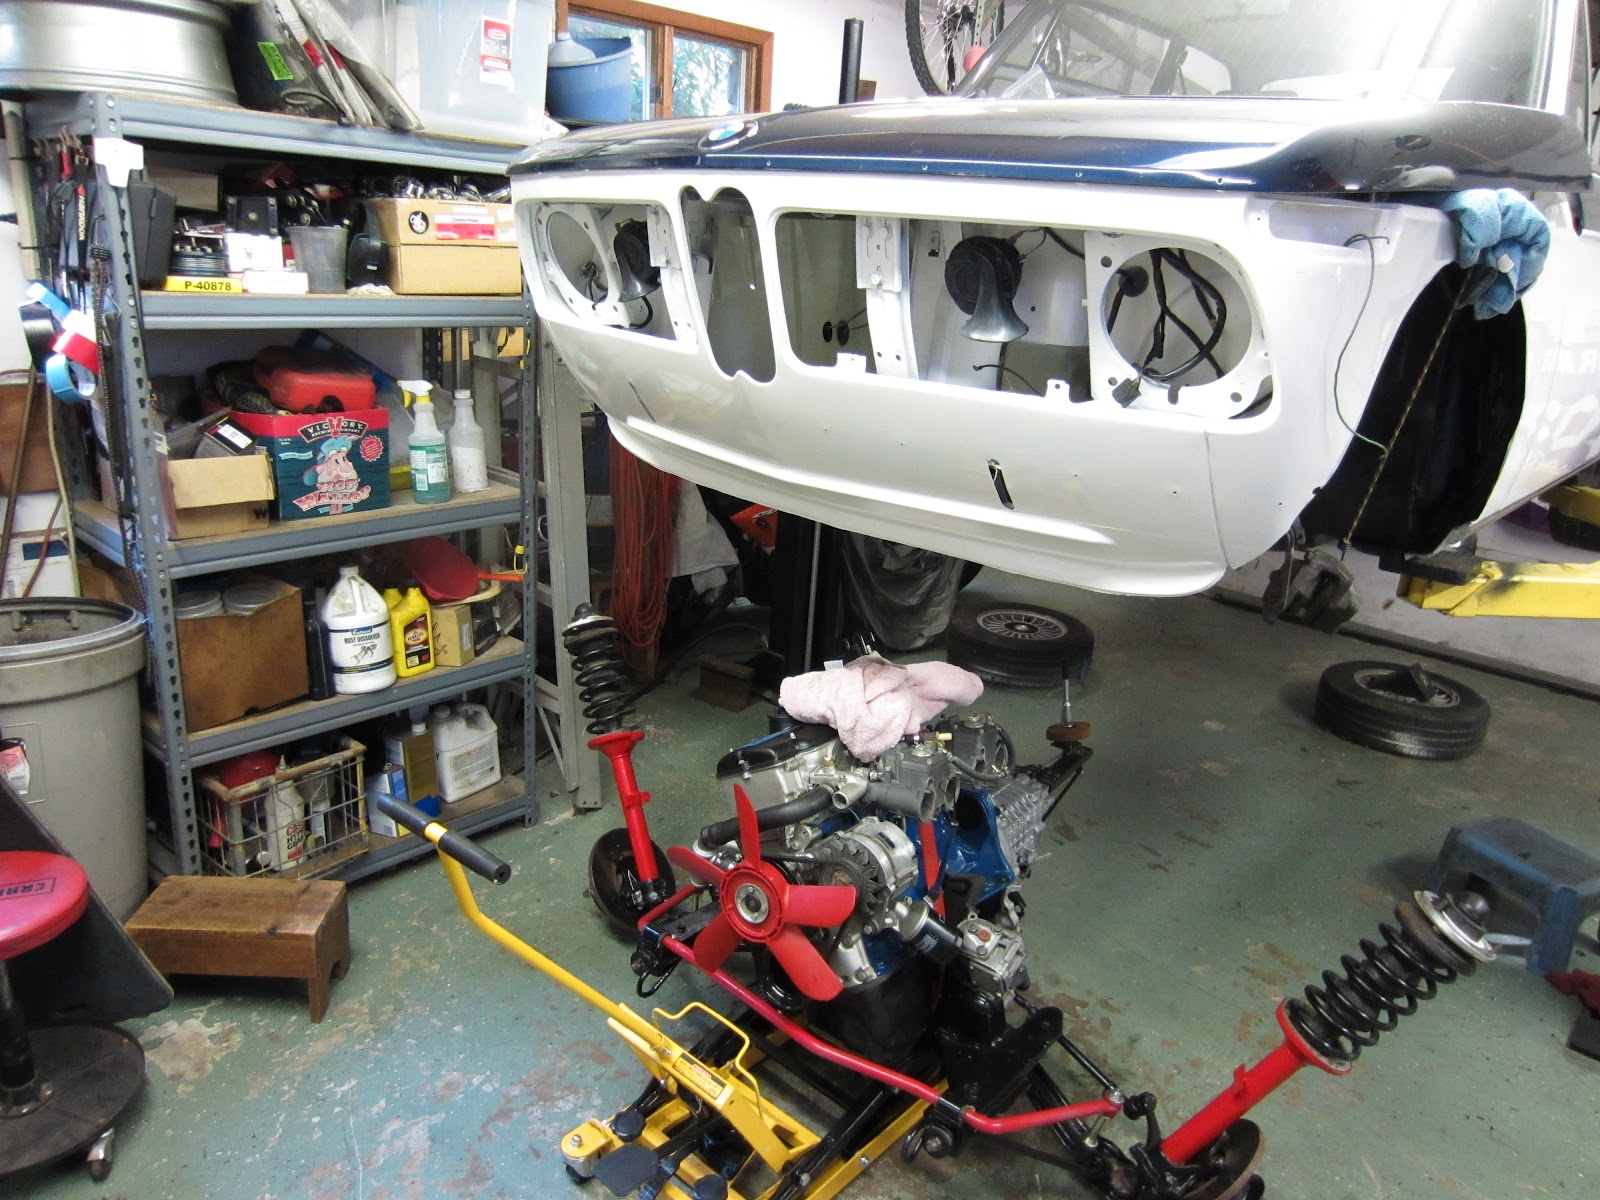
Struts added to make the whole thing unwieldy to handle

The shuttle is approaching the mother-ship

slowly, slowly ....

Ta-da! Shuttle is docked.

Back home again, it's been a while ... exactly 7 months ago it was removed.

Just to prove it's not photo-shopped ...

Still a large amount of work to go, but this is a significant milestone. I'm going to go clean up and have a beer. No make that several beers...

Sunday, August 5, 2012

More bimmer progress

I had a good series of races at NJMP last weekend and will get to them in another post shortly. But first some 2002 updates. I've been toiling away in the garage, making good progress. I'm thinking this is the 2nd phase of my '02 ownership. The first was the mechanical reliability phase. I spent the first couple of years just fixing all the little piddly stuff the previous owners ignored or neglected or just screwed up. Eventually I reached a point where the car was reliable and fun to drive. Things like turn signals, heat, etc just worked. That brought me to the 2nd phase where I'm at now: Serious Cosmetic and Mechanical Restoration. I'd say I'm about 85% complete now. Most of the interior is done. I've been working from the back forward and I'm just about ready to start in the motor compartment. The 3rd phase will be suspension replacement and tuning. That will probably take place this winter when my credit cards aren't so tender to the touch.

So lets go show what I've been up to.

The trunk area is done. gas tank connected, rear trim installed, rear "roundie" lights installed and wired. New trunk gasket glued and installed. Trunk panels cleaned and scrubbed.


Next has been the installation of the stainless steel belt-line trim that I was part of the group buy from BMW2002FAQ.com. It took almost 6 months from order to delivery but it's finally here. With the paint job putting the old tired, and dented trim back on was a non-starter. I didn't replace all the trim, that would be several thousands dollars if you can find it, but kept the decent pieces. When painting I had the lower knee trim deleted, so I decided to just replace the belt-line & rocker panel trim and front grilles.


Stainless steel trunk trim installed
new rocker trim in place.

Even though I got rid of the trunk spoiler, I'm keeping the fender flares. I haven't decided on whether to install the front air dam or not. I'm leaning to leaving it off. We'll see.

Fender Flare - original BMW part for the Turbo

Flares installed - New sealing gaskets from Ireland Racing, and stainless
steel install kit from Walloth and Nesch in Germany

As I head toward the front of the car I did a little prep work on some hood hardware.

As removed, old and tired and corroded.


After a trip to the plating station

Installed the door seals. These were a pain in the ass. There's a tiny grooved slot you need to work the seal into otherwise it won't seal correctly. And you can only do about 4-6 inches at a time. You goop up the door and the seal with trim adhesive, wait 10 mins for both to get tacky and then try to fit it all together in the groove and not smear the goop over everything. If your successful, clamp it and go away and wait for it to dry. Then do the next 4 inches. On a good night I might get 12-18 inches done. Luckily I had bought the drivers side seal about a year ago as they are over $200 apiece now and have been on backorder forever.

inch by inch, ....
My old rocker panel trim piece was seriously screwed up so I ended up throwing it away and driving the car without it. That let a nice stream of air in at speed since the door wasn't sealed - made it noisy also. Not so bad in the summer heat, but sucked when it was 35 degrees out. I had Steve at BluntTech send me two new trim strips.

New interior rocker trim

Ok, other than doing something about my dirty headliner I've arrived at the front. First order of business is to drop the subframe because eventually the motor and tranny will be bolted to in and lifted back into the car. But we have some work to do first (of course).

Naked subframe - rated R for rusty.


I unbolted the calipers and hung them from the car, unbolted the shock towers, undid the 6 bolts holding the subframe and lifted the car up into the air leaving the subframe perched on the jack.

Remember Phase III is the Suspension Rehab/Tune and that's scheduled for this winter so I'm not going to go hog wild here. The goal is to clean stuff up I can and get the running gear back into the car and working again. It's been down for 8 months now and I'd like to have it back on the road this fall.

So the plan is to unbolt bits and pieces, knock off the rust, a little paint, a little POR15, reassemble, attach the motor and tranny and stuff. There's still a lot of work ahead without wandering down a sideroad.

Closer view of the subframe, steering box, struts, etc.
Not great, but not too bad either.


Now the struts, that's another story.


Yuck.

I know, I know. I said no scope creep, but I just can't re-bolt those struts back on the car. Just can't do it. Off to the Restoration Chamber!

After some serious wire brushing

Applying lipstick to the pig - aka Rustoleum Safety Red

Okay, they cleaned up nice.
The inserts and springs will have to wait until this winter after I decide what to do with the suspension. I thinking about an Ireland Stage 1 or 2 kit. But at least it will look nice until then.

Now that it's back on the lift, I'll be spending some quality time inside the engine compartment - some paint touchups, re-wrapping the wiring, cleaning up some paint over-spray, etc.

Hopefully my careful labeling of the master fuse panel will pay off as I reconnect everything.


Plenty more work to come but it's all good. My beer fridge is calling my name, telling me it has an Otter Creek Black IPA and a Stovepipe Porter as well.

My (Premature) Obiturary

Lots of news organizations maintain pre-written obits so that when a celebrity passes, they open up the file and need to just update a few l...