Well the motor in the car I bought thru ebay turned out to be toast, head warped, cylinders scored, etc. But at least there were a good full set of the unobtainium 2.7 valves, so I got most of my money's worth out of it. A fellow racer, Big Joe (aka Chef Joe of 944 Cup) sold me a good block. I had already taken the various bits from multiple dead engines to my machine shop guy, so he could pick out the best of the lot, plus do some other tasks. A call to the shop revealed that, of course, they weren't done yet.
I've learned that machine shops, like mechanics, need to be lied to when they ask the question "When do you want/need it?" If it's anything other than 2 or 3 days, all they hear is "Sometime in the future". So if you say, my first race is on X, they hear "Oh, I can start working on it on 2 weeks before X". It's not really their fault, they can't help it. So just lie. Need it for Road Atlanta in April, tell them "my first race is Sebring in February". Chances are you'll get it done in March. Everybody happy. But I digress.
The machine shop hears "by Thursday" and by Friday, I have my bits back and it's time to start.
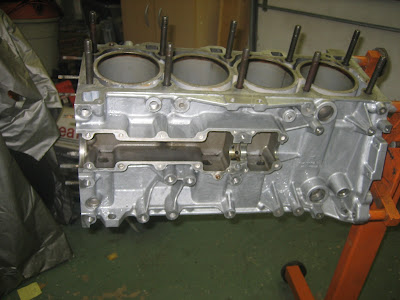
First order of business is to clean up the block and paint it. My pal Joel gives me grief about it, says it retains heat, but I believe the benefits outweigh any downside. The only time my car came close to overheating in the last 5 years is when I had to bypass the external oil cooler and race in the high 90s temperature. A clean engine not only looks good, but makes it easy to spot minor leaks and other issues before they become major. Plus I like the juxtaposition of the flat black stealth car and having a nicely detailed motor hidden inside.
I bought some engine paint from Eastwood and got to work. This is a race motor not a concours queen so I applied it with a foam brush. It makes the block, smooth and clean and much nicer looking than that mottled, oxided aluminum.
Cross-drilled crank and crank girdle attached. Oil pickup has the Lindsey Racing adapter welded to it.
Pistons going in ...
Upper Balance shaft mounted using the high dollar Locktite orange goop. All new bearings of course.
Oil pump and new water pump
Lower balance shaft, and power steering mount attached. If you look real close you'll notice a helping of Hi-Temp permatex gasket sealer on the end seal. Porsche just put a rubber donut around the plug and after a few seasons, this shinks and you get a good leak from back there. This is a huge pain in the ass to fix in the car due to it's position. So a little dab right now will nip that right in the bud.
The Lower balance shaft covered was the first minor bump in the road. When I got the block it was missing the cover. These blocks are aluminum and cast as one piece. The covers to the balance shafts are then sawn off, so the covers are unique and matched to the block. When I went back to get the cover from Joe, he handed me a box of covers, and said try these, these are all I got from Steve. "Don't worry, just goop it up good". I've been down this road before so I was dubious. And I proved prescient.
I picked what I thought was the best and possible match for the missing cover. After torquing the approximately 135 bolts in the approved pattern for the 1st step, the balance shaft is binding. Not good.
Take it all apart and redo. Still binding, this isn't going to work. Pull it all apart and clean all the hi-dollar orange locktite I just wasted, plus the permatex sealer. I sort through my collection of balance shaft covers and try them until eventually I was able to find one that worked. It was a long process, but I trimphed in the end.
Subscribe to:
Post Comments (Atom)
My (Premature) Obiturary
Lots of news organizations maintain pre-written obits so that when a celebrity passes, they open up the file and need to just update a few l...

-
Other than making zoom-zoom noises I'm a pretty useless motor When we last left off, I was young, full of unwarranted optimism, eager ...
-
Hanging out in a Yurt in Tibet with the Golok nomads. Drinking Barley Tea, heated by burning dried yak turds. Some temple details. This wa...
-
Nothing like suffering through the Philly Love Run Half Marathon and vowing never to do it again, and then signing up for another Half. Ye...


.jpg)


No comments:
Post a Comment