A fair amount of progress has been done in the last couple of weeks even though I've been taking it slowly. Let's review.
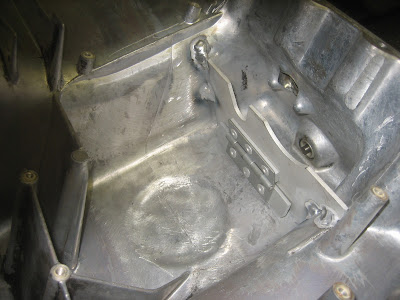
Here's a look at the Lindsey Racing oil pan modification. The hinged door prevents the oil from sloshing all to one side of the pan during hard cornering, leaving the oil pickup tube uncovered and sucking air. This, the cross drilling of the crankshaft and 3 sacrificed squirrels in the back yard are to guard against the dreaded 944 #2 spun bearing issue. When that happens, a frequent outcome is a connecting rod and piston thru the block if you don't catch it in time. My last big boom was something completely different, but you do what you can.
Now the bottom end of the engine is done, so add the oil pan and seal it up.
Oil cooler and engine mounts now attached.
Head with the priceless 2.7 valves now securely bolted down. The bolting sequence is kind of unique. Instead of bolting to a specified torque value, you use degrees. The bolting sequence is in 3 steps. All steps are done using a specific pattern. The first step is a light torque to settle everything. Wait 15 minutes, then turn the nut 60 degrees. Wait another 15 minutes and then again turn each nut 60 degrees. Sounds weird but that's what the factory manual calls for.
Bolted various bits to the front of motor. Attached the balance shaft pulleys, making sure they were aligned correctly using the obscure Porsche marks as they need to be 180 degrees out of phase with each other when running. Added the spring tensioner device which will be used to tension the timing belt later. The main crank pulley was added. The bit of red tape is to remind me I need to torque the bolt to 150 ft/lbs later. With it on the engine stand there's nothing to stop it from spinning when I start to tighten it down. I'll get to it later.
Later came today. I had to use my engine hoist and pull the motor off the stand so I could add the rear main seal and attach the flywheel. The spot of yellow paint allows me to see the timing mark through a little inspection hole when the motor is all buttoned back up in the car.
Once that was done, I hoisted it back into the air and back onto the engine stand. With the flywheel attached I could use my little homemade tool and lock the motor and keep it from spinning. I made short work of torquing down the crank bolt and that red tape is now gone.
But just because I threw that red tape into the trash doesn't mean we are done with the color red. Meet Ms. Camtower, all prettied up in her holiday fashion.
Getting close to the end of the mechanical work now. It's starting to look like a real motor now.


.jpg)


No comments:
Post a Comment