Friday, February 22, 2013
Friday Video: BMW Design Head talks about design
Today's treat is a nice little (7 min) video of the current head of BMW Design, Karim Habib as he talks about his work and design in general. Interestingly, the car he drives is an Inka Orange 2002 Tii (shown driving in the film around Munich). That car still has a hold on the core of BMW. Nice to know.


Wednesday, February 20, 2013
Visiblity mod
As part of the '02 restoration, I replaced the US spec frog eyes front turn signals with Euro turn signals. Not only do they look way cooler, the car is an Euro model so it's only returning back to stock.
One advantage - probably the only - is the US spec turn signals have an extra bulb that lights up - aka parking lights. The Euro ones only have a single bulb, so at night there's only light when the turn signal is activated.
Somebody on the BMW2002FAQ forum came up with a nice mod to add the missing functionality. Start off with a GM right angle license plate socket (Dorman #85868) that I picked up at the local AutoZone.
With a step drill, I drilled an 11/16 hole and mounted the socket to the light bracket.

Since the lights are grounded to the body, I drilled a small hole and mounted the ground lead from the socket with a sheet metal screw.

** Cool Tool Alert ***
While I was in the middle of this mod, I got my Klein Journeyman Crimping Pliers. For years I been using those cheap yellow stamped steel electrical connector crimpers that everybody has. I've never been real happy with their use. It's a crappy tool. While doing the front fog light install, I added a couple of relays and did a fair amount of electrical wiring. In the middle of it I said enough! I'm done with crappy crimps and off to Amazon.com. Well it's finally here, and it's great tool. Expensive ($30) but worth it. Easy, and ergonomic to use and does solid crimps, one after another. Recommended.
And now back to our regularly scheduled blathering ....

 |
| Flat European turn signals |
 |
| Bulbous US spec lights |
One advantage - probably the only - is the US spec turn signals have an extra bulb that lights up - aka parking lights. The Euro ones only have a single bulb, so at night there's only light when the turn signal is activated.
Somebody on the BMW2002FAQ forum came up with a nice mod to add the missing functionality. Start off with a GM right angle license plate socket (Dorman #85868) that I picked up at the local AutoZone.
 |
| I told the car the GM stands for Generalisimo Motors ... |
With a step drill, I drilled an 11/16 hole and mounted the socket to the light bracket.

Since the lights are grounded to the body, I drilled a small hole and mounted the ground lead from the socket with a sheet metal screw.

** Cool Tool Alert ***
While I was in the middle of this mod, I got my Klein Journeyman Crimping Pliers. For years I been using those cheap yellow stamped steel electrical connector crimpers that everybody has. I've never been real happy with their use. It's a crappy tool. While doing the front fog light install, I added a couple of relays and did a fair amount of electrical wiring. In the middle of it I said enough! I'm done with crappy crimps and off to Amazon.com. Well it's finally here, and it's great tool. Expensive ($30) but worth it. Easy, and ergonomic to use and does solid crimps, one after another. Recommended.
 |
| Cheap shitty crimping tool |
 |
| Klien Crimping Pliers - awesome! |
And now back to our regularly scheduled blathering ....
Here's the final result:

Tuesday, February 19, 2013
44 Nose Job
Picked up the 44 from the folks up at Bodymotion yesterday. A mostly positive result. First they put the car up on the frame bench to check it and the car is straight, with all the suspension points aligned and within spec. So that's great news to start off the season.
Next they spent some time yanking all the sheet metal in the front in various directions trying to get the gaps all to line up. The front sheet metal around the radiator support and other metal were seriously "adjusted" over the last several years of racing and repairs. Now the new turbo fenders, header panel and hood are lining up with only small even gaps and the car looks good. Relatively speaking of course. I still have a lot of sanding and painting ahead of me, but that's monkey's work, I can do it.
The next thing they were going to do for me was a corner balance and alignment. As they started working on it they found a couple of issues that I will need to address. First the trick Mantisport strut hats I put on for last season, it seems that the springs are binding in the tower. I had heard the helper springs binding and releasing in slow parking lot turns earlier. But now, at least on the left side, the top of the coils were solidly bound up and frozen. That's why I needed to use a 2x4 under the left front wheel to get my lift arm under the car. So a future order of business is to remove the strut hats and replace with my old camber plates. They also discovered play in one of the rear banana arm spherical bearings. I'll have to pull it and see.
The above issues makes corner balance and alignment a waste of money until I address them. So they moved on to the next task. Fabbing the support for the fiberglass turbo nose.
The guys did a great job with it. They did in a day what would have taken me several weeks of futzing around and did a better job than I probably would have.
They build a nice tubular steel frame and welded dzus tabs for easy on/off of the nose.


I still have a fair amount of work to go: Cut the radiator holes in the spoiler; fab up a tow hook; relocate the oil cooler, painting and more. But I got a great foundation.
Next they spent some time yanking all the sheet metal in the front in various directions trying to get the gaps all to line up. The front sheet metal around the radiator support and other metal were seriously "adjusted" over the last several years of racing and repairs. Now the new turbo fenders, header panel and hood are lining up with only small even gaps and the car looks good. Relatively speaking of course. I still have a lot of sanding and painting ahead of me, but that's monkey's work, I can do it.
The next thing they were going to do for me was a corner balance and alignment. As they started working on it they found a couple of issues that I will need to address. First the trick Mantisport strut hats I put on for last season, it seems that the springs are binding in the tower. I had heard the helper springs binding and releasing in slow parking lot turns earlier. But now, at least on the left side, the top of the coils were solidly bound up and frozen. That's why I needed to use a 2x4 under the left front wheel to get my lift arm under the car. So a future order of business is to remove the strut hats and replace with my old camber plates. They also discovered play in one of the rear banana arm spherical bearings. I'll have to pull it and see.
The above issues makes corner balance and alignment a waste of money until I address them. So they moved on to the next task. Fabbing the support for the fiberglass turbo nose.
 |
| New nose installed |
The guys did a great job with it. They did in a day what would have taken me several weeks of futzing around and did a better job than I probably would have.
They build a nice tubular steel frame and welded dzus tabs for easy on/off of the nose.


I still have a fair amount of work to go: Cut the radiator holes in the spoiler; fab up a tow hook; relocate the oil cooler, painting and more. But I got a great foundation.
Sunday, February 3, 2013
Cool tool of the day: lubricheck
I just got a cool gadget into the garage. It's a Lubricheck, engine oil tester. While you can buy an oil tester like the NASCAR guys use, but they're up around $600-800, not alpine garage money territory. The Lubricheck guys have been developing this for the last couple of years as a Kickstarter project trying to develop one below $50. Well they finally delivered and I got mine in the mail the other day.
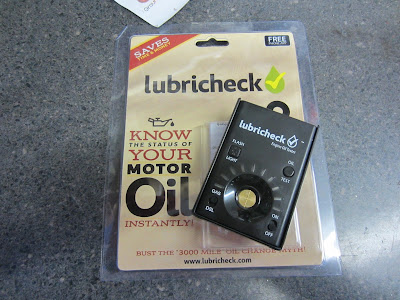
It works by measuring the dielectric and impedance of the oil sample on the sensor in the middle of the device and then shows a rating of the oil from 1 to 10, where 1-7 is good, 8-9 fair, and 10 means the oil time is done. I can use this to measure my oil state before and after every race weekend and know how my oil and also my motor is doing.
It's easy to use, just turn it on, wait for it to calibrate, and then add a droplet to cover the sensor area.
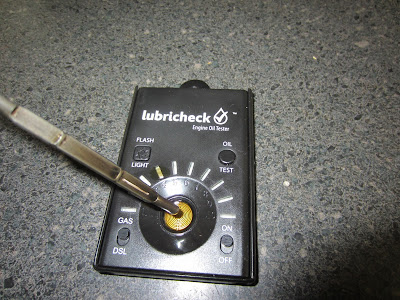
Press the test button and wait for the result.

In this case it's measuring the oil in my BMW 2002, and reported back 8 or fair. Which is probably a good assessment of the quality as it's the break-in oil still in the motor and should be changed shortly.
All in all, it looks like an interesting tool to add to the garage. For more info, check out their website at
www.lubricheck.com

It works by measuring the dielectric and impedance of the oil sample on the sensor in the middle of the device and then shows a rating of the oil from 1 to 10, where 1-7 is good, 8-9 fair, and 10 means the oil time is done. I can use this to measure my oil state before and after every race weekend and know how my oil and also my motor is doing.
It's easy to use, just turn it on, wait for it to calibrate, and then add a droplet to cover the sensor area.

Press the test button and wait for the result.

In this case it's measuring the oil in my BMW 2002, and reported back 8 or fair. Which is probably a good assessment of the quality as it's the break-in oil still in the motor and should be changed shortly.
All in all, it looks like an interesting tool to add to the garage. For more info, check out their website at
www.lubricheck.com
Tuesday, January 29, 2013
Show me the Numbers!
Continuing the theme of late blogging here's some more '02 work done earlier this month.
Not having convenient access to a chassis dyno anymore - they all seem to go out of business - I want some hard data on tuning my car. The car has a pair of big DCOE 45 Weber carbs and running the numbers all my jets, chokes and venturis are probably in the ballpark. And the car is seemingly running well, but how do you really know without numbers or a baseline? Tuning Webers can be an art but I already have a day job and too many hobbies, I don't need an apprenticeship taking several years. I'd rather be driving, racing or drinking beer.
Being a typical American with a short attention span, I want a quicker way to motoring bliss. So I bought an AEM Air/Fuel ratio gauge to help me dial in the motor. They make a nice analog version which complements my vintage style VDO gauges so it doesn't look too out of place. With this I can fiddle with timing, jets and throttle applications and get the numbers. As while your seat of the pants will lie to you, the numbers don't.
I swapped out my existing clock and shuffled the other gauges around. When I'm driving the bimmer I don't really care what time it is. I'm keeping the Oil Pressure and Temps, and the Voltmeter.
First step is wiring it up.
And in a nice gesture to my future senility and/or the next owner, I tagged the wires with their function.

Meanwhile, I took the header to my local muffler shop - Midway Muffler in Elsmere. They work on my racecar exhaust system and are good guys. For $20 they welded a bung to the header for the O2 sensor.

Unfortunately, all the work I did earlier in the year to the header - de-rusting it, painting it with satin black high temp paint - came to naught. Every time I start the car I have to endure a couple of minutes of smoke coming from the headers as they cook off the paint. Plus they are beginning to rust again.

But as usual, I have a plan. They'll be taking a journey down to Crazy Coatings in Middletown, where they'll get bead blasted, and ceramic coated. I'm expecting it to be $250 or less. Take That Rust! Going No Mercy on your ass. Pics when done.
 |
| AEM A/F Ratio analog gauge powering up |
Not having convenient access to a chassis dyno anymore - they all seem to go out of business - I want some hard data on tuning my car. The car has a pair of big DCOE 45 Weber carbs and running the numbers all my jets, chokes and venturis are probably in the ballpark. And the car is seemingly running well, but how do you really know without numbers or a baseline? Tuning Webers can be an art but I already have a day job and too many hobbies, I don't need an apprenticeship taking several years. I'd rather be driving, racing or drinking beer.
Being a typical American with a short attention span, I want a quicker way to motoring bliss. So I bought an AEM Air/Fuel ratio gauge to help me dial in the motor. They make a nice analog version which complements my vintage style VDO gauges so it doesn't look too out of place. With this I can fiddle with timing, jets and throttle applications and get the numbers. As while your seat of the pants will lie to you, the numbers don't.
I swapped out my existing clock and shuffled the other gauges around. When I'm driving the bimmer I don't really care what time it is. I'm keeping the Oil Pressure and Temps, and the Voltmeter.
First step is wiring it up.
 |
| Gauges rat's nest of wiring |
And in a nice gesture to my future senility and/or the next owner, I tagged the wires with their function.

Meanwhile, I took the header to my local muffler shop - Midway Muffler in Elsmere. They work on my racecar exhaust system and are good guys. For $20 they welded a bung to the header for the O2 sensor.

Unfortunately, all the work I did earlier in the year to the header - de-rusting it, painting it with satin black high temp paint - came to naught. Every time I start the car I have to endure a couple of minutes of smoke coming from the headers as they cook off the paint. Plus they are beginning to rust again.

But as usual, I have a plan. They'll be taking a journey down to Crazy Coatings in Middletown, where they'll get bead blasted, and ceramic coated. I'm expecting it to be $250 or less. Take That Rust! Going No Mercy on your ass. Pics when done.
Monday, January 28, 2013
Studs
An ongoing bit has been sorting the suspension of the 2002. The major part so far is the tire and wheels combo. The car as bought came with 13 inch BMW turbine wheels from an E30 with little tiny tires ('quality' US General tires). Try finding decent tires in 13 inches these days, it's slim pickings out there.
Anyway, I wanted something better looking and really liked the look of Minilites/Panasports. They had a nice vintage racy appeal. I ended up buying a set of Rota RB's in gunmetal in 15 inches. They're a popular wheel from Spain with the Minilite look. 15 inches will give me a much greater selection of modern tires.
Complicating matters is the car isn't what you would call stock. With the turbo flares mounted, I'm not restricted to the original mounting and offsets. In fact, if I mounted stock wheels on the car it would look pretty funny, like a clown car, as they wouldn't come close to filling out the flares. And there isn't any guide where I can just go lookup what size wheel I need. I need to measure, fiddle, fuss and guess, and repeat.
After thinking about it for several months, I pulled the trigger and bought the above wheels. They look great and fill out those wheel arches.
Problem is, they rub.
They rub in front, and they rub in back. Now reading the forums, this is liking saying 'hey, the sky is blue'. They all do that with 15 inch tires. The common consensus here is a BFH is your friend. Find out where it's rubbing - use some spray paint as a marker and go for a spirited ride - and then "adjust" the wheel well.
So I been doing a little of that, plus playing with spacers, plus playing with the size of the tires. My local tire guy loves me. At this point I'm getting a volume discount on tire changes. I'm closing in on my perfect tire/wheel/spacer combo but the snow and salted roads are upon us so the research program is on hold.
But while doing my 'research' aka hooning on the local roads, I started worrying about the engagement of my studs and wheel nuts.The wheels have deep socket wells and I'm using spacers so it's hard to gauge how much stud the lug nuts are clamping down on. I decided I would feel better with longer wheel studs. Off to the internet and Ireland Engineering's web page.
A week or two later and I have a set of new studs and lug nuts.

Since the new studs are a bit longer than the original, I couldn't finesse the installation and needed to pull the rear hub.
Using my vise I pounded out the originals with a hammer and with a socket wrench pulled the new ones in.

Of course, we all know the color red makes everything go faster, so I painted the rusty drums with Rustoleum red.

Back on the car ...

The end result.

Yup, safer, subtle and faster. Just the way I want it.
Anyway, I wanted something better looking and really liked the look of Minilites/Panasports. They had a nice vintage racy appeal. I ended up buying a set of Rota RB's in gunmetal in 15 inches. They're a popular wheel from Spain with the Minilite look. 15 inches will give me a much greater selection of modern tires.
 |
| Rota RB's with Kumho AST performance tires. |
After thinking about it for several months, I pulled the trigger and bought the above wheels. They look great and fill out those wheel arches.
 |
| Before the repaint |
Problem is, they rub.
They rub in front, and they rub in back. Now reading the forums, this is liking saying 'hey, the sky is blue'. They all do that with 15 inch tires. The common consensus here is a BFH is your friend. Find out where it's rubbing - use some spray paint as a marker and go for a spirited ride - and then "adjust" the wheel well.
So I been doing a little of that, plus playing with spacers, plus playing with the size of the tires. My local tire guy loves me. At this point I'm getting a volume discount on tire changes. I'm closing in on my perfect tire/wheel/spacer combo but the snow and salted roads are upon us so the research program is on hold.
But while doing my 'research' aka hooning on the local roads, I started worrying about the engagement of my studs and wheel nuts.The wheels have deep socket wells and I'm using spacers so it's hard to gauge how much stud the lug nuts are clamping down on. I decided I would feel better with longer wheel studs. Off to the internet and Ireland Engineering's web page.
A week or two later and I have a set of new studs and lug nuts.

 |
| original stud on left, new one on right |
Since the new studs are a bit longer than the original, I couldn't finesse the installation and needed to pull the rear hub.
 |
| Pulling the hub with my handy dandy Harbor Freight puller |
Using my vise I pounded out the originals with a hammer and with a socket wrench pulled the new ones in.

Of course, we all know the color red makes everything go faster, so I painted the rusty drums with Rustoleum red.

Back on the car ...

The end result.

Yup, safer, subtle and faster. Just the way I want it.
Sunday, January 27, 2013
Onward into 2013 - 944 update
Welcome readers, all 3 of you, to 2013. While I have been lax with my updates, that's not because I haven't been busy in the garage.
With the '02 driveable - but not finished, I've been running about town and adding to my tick list of things to do which I'm sure will show up here in the future - I've turned my attention to the 944 race car. While the first race is in May, as usual, I have a long list of things planned. New rear rotors went on the car and then after a through inspection I turned my attention to the front.
My major oil leak I had been battling most of last year was identified as 2 sources: a upper balance shaft front seal and a cam tower gasket seal.
As the balance shaft hides behind the belt covers, pretty much the whole front of the engine needs to come off. A couple of nights of labor and it was all back together. Another night for the camtower seal and I was done.
After bringing the car up to temp and bleeding the coolant lines (and smoking out the garage from the oil spilled on the headers), my major leak was gone (Yayyy!) but I still had a slow leak from somewhere else (Boooo...) It wasn't the camtower gasket. I ordered a fluorescent dye kit from Amazon and I'll give it a go when that shows up. Let's keep going.
While a year late, its time for Project Turbo Nose.
I had bought a fiberglass turbo nose a year and half ago with the intention of mounting it last winter. Well the motor rebuild last winter turned to be more time consuming than planned, so much for that idea. I probably wouldn't have finished it anyway, as it turned out I also needed a turbo nose panel, headlight covers and fenders to make a go of it. I scored those bits at the Hershey Swap meet last spring and they have been slumbering in my attic ever since. Their time has come.
First up is removal of the old, banged up bits.
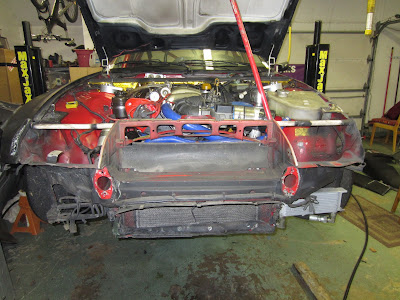

Next it was time for some test fitting of the turbo panels.
With the panels vaguely fitted, I did a quick sand and prime.

Looking good so far.
The next step to get ready is to make sure the car is straight. Over the last several years the car and driver have been attending the School of Hard Knocks. Notice in the picture above the 2x4 under the front left wheel. Without it I can't get my lift arm under the car, while the other arms fit with no problem. So I'm hauling the 44 up to Bodymotion in North Central New Jersey to have them put it up on their frame bench and apply some auto yoga to it. Gotta get my chakra in tune you know. While it's there, I'm going to have them hang the fiberglass front spoiler for me. I figure as a race shop their welding just might be a little better than mine. I'll do the sanding and painting when it comes back, plus relocate the oil cooler and other bits.
With it and the trailer gone for a couple of weeks, time to work on the '02 again. With winter finally here and salt being put down on the roads, the little bimmer is on vacation back in the garage. And I still have plenty to do.
With the '02 driveable - but not finished, I've been running about town and adding to my tick list of things to do which I'm sure will show up here in the future - I've turned my attention to the 944 race car. While the first race is in May, as usual, I have a long list of things planned. New rear rotors went on the car and then after a through inspection I turned my attention to the front.
My major oil leak I had been battling most of last year was identified as 2 sources: a upper balance shaft front seal and a cam tower gasket seal.
 |
| Naked Upper Balance Shaft - happy to see someone |
As the balance shaft hides behind the belt covers, pretty much the whole front of the engine needs to come off. A couple of nights of labor and it was all back together. Another night for the camtower seal and I was done.
 |
| Home of Click & Clack - the Tappet Brothers |
After bringing the car up to temp and bleeding the coolant lines (and smoking out the garage from the oil spilled on the headers), my major leak was gone (Yayyy!) but I still had a slow leak from somewhere else (Boooo...) It wasn't the camtower gasket. I ordered a fluorescent dye kit from Amazon and I'll give it a go when that shows up. Let's keep going.
While a year late, its time for Project Turbo Nose.
I had bought a fiberglass turbo nose a year and half ago with the intention of mounting it last winter. Well the motor rebuild last winter turned to be more time consuming than planned, so much for that idea. I probably wouldn't have finished it anyway, as it turned out I also needed a turbo nose panel, headlight covers and fenders to make a go of it. I scored those bits at the Hershey Swap meet last spring and they have been slumbering in my attic ever since. Their time has come.
First up is removal of the old, banged up bits.


Next it was time for some test fitting of the turbo panels.
 |
| MX Blaster tool used to remove the decals |

Looking good so far.
The next step to get ready is to make sure the car is straight. Over the last several years the car and driver have been attending the School of Hard Knocks. Notice in the picture above the 2x4 under the front left wheel. Without it I can't get my lift arm under the car, while the other arms fit with no problem. So I'm hauling the 44 up to Bodymotion in North Central New Jersey to have them put it up on their frame bench and apply some auto yoga to it. Gotta get my chakra in tune you know. While it's there, I'm going to have them hang the fiberglass front spoiler for me. I figure as a race shop their welding just might be a little better than mine. I'll do the sanding and painting when it comes back, plus relocate the oil cooler and other bits.
With it and the trailer gone for a couple of weeks, time to work on the '02 again. With winter finally here and salt being put down on the roads, the little bimmer is on vacation back in the garage. And I still have plenty to do.
Subscribe to:
Posts (Atom)
My (Premature) Obiturary
Lots of news organizations maintain pre-written obits so that when a celebrity passes, they open up the file and need to just update a few l...
-
 Hanging out in a Yurt in Tibet with the Golok nomads. Drinking Barley Tea, heated by burning dried yak turds. Some temple details. This wa...
 -
.jpg) Other than making zoom-zoom noises I'm a pretty useless motor When we last left off, I was young, full of unwarranted optimism, eager ...
Other than making zoom-zoom noises I'm a pretty useless motor When we last left off, I was young, full of unwarranted optimism, eager ... -
 Nothing like suffering through the Philly Love Run Half Marathon and vowing never to do it again, and then signing up for another Half. Ye...