2.7 Engine Rebuild (part 3)
Assembly is the reverse of Dis-assembly right? At least that's the conventional wisdom, but I'm not sold on that. You try making beer out of urine ....
Building a motor is a lot of work, so before we get started, let's take a break and take a look at why I'm (other than insanity) doing this.

Step 1 is pulling the now very expensive yard ornament from the racecar. Practice makes perfect, Joel & I had the motor out and on the stand by lunchtime even starting late.

This is the fist size hole in the oil pan that let out all the smoke and caused the car to stop running.

Popping off the oil pan reveals an unattached connecting rod (or what's left of it) in #2 cylinder (middle of picture).

Further inspection reveals another hole in the side of the block itself. Plus lots of bits of debris everywhere. It wasn't a happy moment when the rod bearings seized. Hopefully the crank can be saved by the machine shop later.

The Head is going to need some work before it can play again. All those valves should be flush, not popping up like a game of Whack-A-Mole
Ok, we've set the scene, and parts are starting to trickle back from the machine shop. So its time to stop drinking beer and get to work.

One of the reliability modifications that was recommended was to cross-drill the crank. This means drilling another hole in the #2 and #3 rod bearing areas. Tests have shown that this balances out the oil flow to the rod bearings in a 944. The #2 rod bearing is notorious for failing due to low oil flow leading to the result shown in the pictures above. Here we see the new drilled holes in the crankshaft.

Since I'll never have this ease of access again, let's make the engine purty. The block (and other parts) came back reasonably clean from the machine shop, but far from perfect. I spent some time with a wire brush, picks and mineral thinner and cleaned out all the gunk in the corners and crevices. I then masked it - the red junk is Mobil1 cv joint grease to protect the seal area, the paint just wipes off afterwards - and hit it with a couple coats of high temp engine primer paint, followed by engine silver paint. This the back end of the motor where the flywheel and clutch live and soon will be buried deep in the bellhousing and won't be visible to anybody. But hey, good work is all in the details and I know it looks good in there. I'm sure the flywheel appreciates it also. I'd ask him, but he's hanging out in the bar with the intake manifold catching up on old times. They don't get together that much these days.

Next up is a picture of the crankshaft girdle (holds the crank to the case) with nice new main bearings being installed. You can see the holes to lubricate the center main bearing.

This is the Rear Main seal that prevents all the oil from pouring out from around the spining crankshaft. I had to use the 4" PVC Cap from the tubes that store my canopy poles in the racecar trailer, to tap the seal in evenly flush with the case. I then took a 3/4 inch extension and used that to tap the seal all into the back of the block. Its important to do this nice and slow as it really, really sucks if it starts leaking as you pretty much have to take the engine out again to fix it. We'll find out later how slow and methodical I was.

Just like the back of the block I'm painting the sides and front. Same routine with the picks and mineral spirits. Here's one of the primer coats being laid down.

For perspective, here's the "Before" picture of the oil cooler.

And here's it cleaned-up, painted and mounted.

The front of the block with the oil pump mounted on the crankshaft. Lots more stuff to come here. Belts, rollers, pullys, water pump, yada yada ... Hours and miles to go before I sleep.

some time later .... the f*3k%@! balance shafts are done - one in the upper right, the other one hiding behind the power steering bracket lower left - What should have a been an easy task turned out to be the major time sink so far. The damn things kept binding when the last two bolts were torqued to specs. Final solution was to load up the two bolts with Locktite, tighten until they start to bind, and back off. This is the only part of the process I'm worried about. Everything else is going together fine. The yellow water pump looks great! I'm sure it's worth 5-10 hp easily

Told ya, lots-o-crap (that's a Porsche mechanic technical term) up front. Got you ya belts, (bling alert) crankshaft pulley, rollers, spring tensioners, etc. Busy area and still more to come.
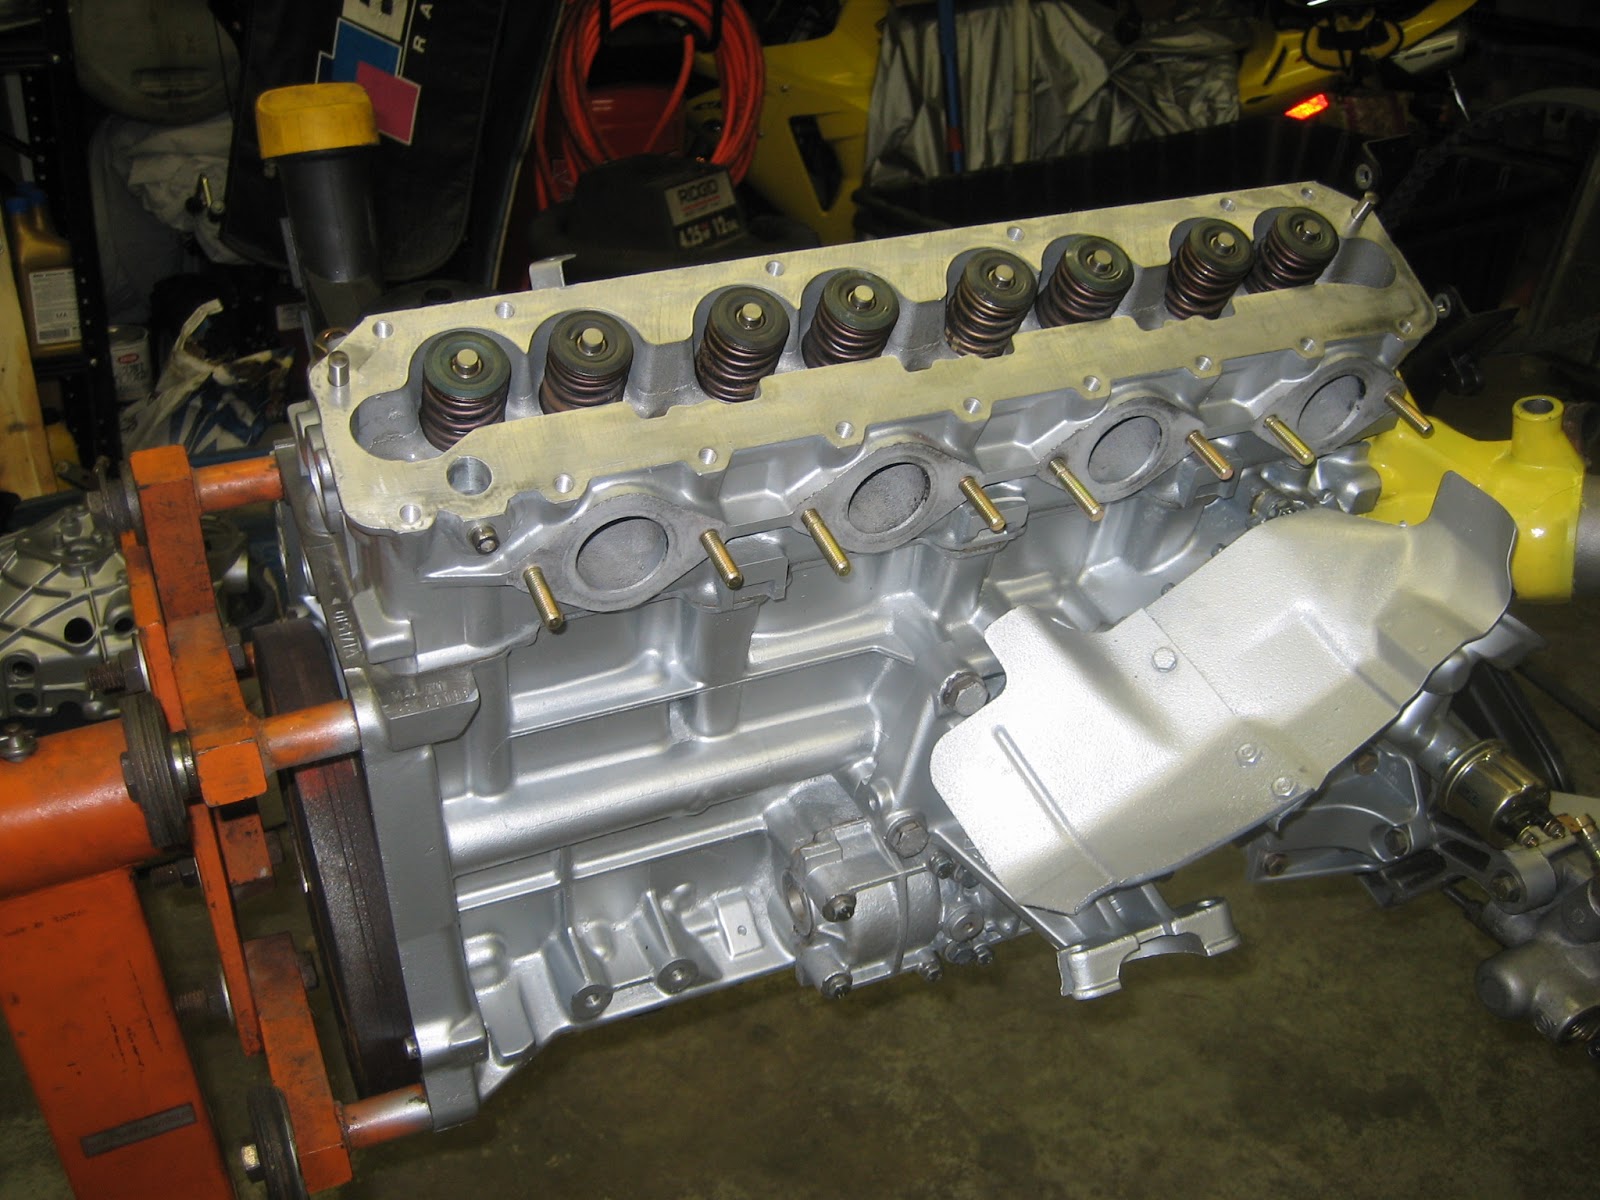
Got the head back from the shop and slapped it on. Good news it didn't need any of those plutonium enhanced $$$$ valves. And proving that I'm teachable, this time I put in the oil reducing valve BEFORE I dump 6 qts of Mobil1 on my garage floor. I still may dump massive amount of fluids on the floor when I start it up, but it'll be from a NEW mistake.

Did some more modifications to the oil system to improve reliability - i.e. I don't want to rebuild this motor ever again - with the additions of the Lindsey Racing oil pan baffle kit. On the left is the oil pickup tube that sits in the oil pan with ring that has been welded on it to prevent oil from escaping on the sides. On the right is the hinged baffle that swings shut under loading in turns, preventing the oil pickup from sucking air when you're doing those massive tire smoking, 4 wheel drifting power slides .. oh sorry, I forgot we're talking about a 3000 lb, 150 hp Porsche 944 non-turbo, my bad. Anyway, it will help.


While waiting for the machine shop to finish up with the head, I took the time to wrap the exhaust headers to manage some of the heat under the hood. This is some kind of fiberglass, abestos wrap that insulates the pipes. It then gets sprayed down with a hi-temp silcon coating. Looks nice, compared to those nasty rusty headers from before.
And check that nice shiny oil pan hiding. Sweet! I'm going to have to start entering concours events.

My engine looked so nice and pristine, but now I have to go clutter it up with the wiring and hose junk. Can't be helped. Here the main wiring harness is starting to be routed, alternator is connected and some of the vacuum hoses are being attached.

And here we are in the middle of January. The signature Camtower has been attached, now I can get those oohs and ahhs when I pop the hood at the Dairy Queen - oh yeah, its not street legal so I can't drive it there ... but I can dream! - I have a short list now, finish the wiring, install the intake manifold, finish the vacuum lines, drop it off the engine stand, attach the clutch and bell housing and then pop it in the car. I can't wait.


.jpg)

No comments:
Post a Comment